Creating and Testing Snort Rules Part 1
A lab utilizing Snort to create and test custom intrusion detection rules.

This post will focus on creating and testing custom intrusion detection rules using Snort, an open-source network intrusion detection system. We will use the lab environment set up in the previous post to create and test rules against various network traffic scenarios. Read more about Snort here.
Objectives: Learn how to use
Snortto boost network security
What is Snort?
Snort is an open-source network intrusion detection system (NIDS) that can monitor network traffic in real-time, analyze packets, and detect suspicious or malicious activity. It uses a combination of signature-based detection, protocol analysis, and anomaly detection to identify potential threats on the network. It is widely used in cybersecurity operations to enhance network security and detect intrusions or unauthorized activities.
Snort operates in several modes: Sniffer Mode, Packet Logger Mode, Network Intrusion Detection System (NIDS) Mode, and PCAP Mode. Each mode serves a distinct purpose, making Snort a versatile tool for different network monitoring and security needs.
Sniffer Mode
In Sniffer Mode, Snort functions as a basic packet sniffer, capturing and displaying network packets in real time. This mode is ideal for analyzing live network traffic to troubleshoot issues or gain insights into network behavior. Sniffer Mode captures raw packet data and provides information such as source and destination IP addresses, protocols, and packet contents. It is primarily used by network administrators to monitor traffic flows and identify potential issues, but it does not save or log the captured packets for later analysis. This will be the main focus of this lab.
Packet Logger Mode
When running in Packet Logger Mode, Snort takes on the role of a packet capture tool, storing network traffic to disk for detailed examination. This mode is useful for forensic analysis, as it allows users to log packets for specific network segments or time periods. The logged packets can be analyzed offline using Snort or other tools, enabling administrators to investigate suspicious activities, analyze trends, or generate traffic reports. Packet Logger Mode is particularly helpful for environments where maintaining a record of network activity is critical for compliance or auditing purposes.
Network Intrusion Detection System (NIDS) Mode
NIDS Mode is the most powerful and widely used mode of Snort. In this mode, Snort analyzes network traffic in real time to detect and respond to potential threats. It compares captured packets against a set of predefined rules to identify malicious activity, such as attempted exploits, unauthorized access, or malware communication. When a threat is detected, Snort can generate alerts or take predefined actions, such as logging the event or blocking the traffic. NIDS Mode combines signature-based detection, anomaly-based detection, and protocol analysis to provide comprehensive intrusion detection capabilities. It is often deployed as part of a larger security infrastructure to monitor and protect critical systems.
PCAP Inspection
Snort can also be used to analyze PCAP files, which are packet capture files containing network traffic data. By loading PCAP files into Snort, users can analyze historical network traffic, identify patterns, and detect potential security incidents. This feature is useful for investigating past security events, analyzing network behavior, or testing new detection rules. PCAP inspection allows users to leverage Snort’s detection capabilities on captured traffic without the need for a live network connection.
Snort Rules
Snort is highly customizable and extensible, allowing users to create custom rules to detect specific patterns of network traffic associated with known attacks or vulnerabilities. It uses both signature-based and anomaly-based detection methods to identify threats. Its functionality relies on rule files, which include a variety of pre-installed rules for detecting known attack patterns. While the built-in rules effectively identify much malicious traffic, you can customize Snort to detect specific types of network activity that go beyond the default settings. Users can create custom rules tailored to their requirements or disable default rules that may not apply to their environment, ensuring a more focused and efficient detection system.
As mentioned earlier, Snort also can be used as an Intrusion Prevention System (IPS) by blocking malicious traffic. However, there are better options for taking action on malicious traffic, and Snort will shine more alongside other tools for this purpose. I will demonstrate both detection and prevention in this lab.
Below is the structure of a typical Snort rule:
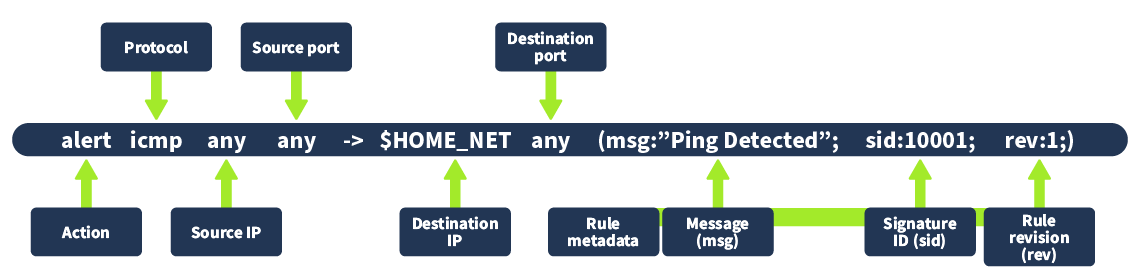
The rule structure consists of the following components:
Action : The action to take when the rule matches a packet. Common actions include alerting, logging, and dropping packets.
Protocol : The protocol to which the rule applies, such as TCP, UDP, or ICMP.
Source IP and Source Port : The source IP address and port number of the packet.
Direction : The direction of the traffic flow, such as -> for outbound traffic or <- for inbound traffic.
Destination IP and Destination Port : The destination IP address and port number of the packet.
Rule Options : Additional criteria that must be met for the rule to trigger, such as specific content patterns, IP addresses, or ports.
Rule Metadata : Information about the rule, such as its ID, revision number, and classification.
This covers the basics of Snort and its rule structure. In the next section, we will create custom rules and test them in our lab environment.
Installing Snort
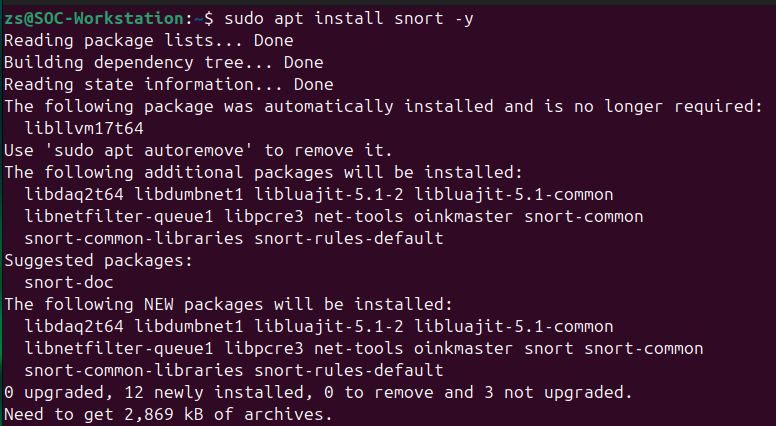
Before we proceed with creating and testing custom rules, we need to install Snort on our Ubuntu machine. The installation process may vary depending on your operating system and package manager. Using the package manager, we can easily install Snort and its dependencies. For Ubuntu, you can install Snort using the following command:
1
sudo apt install snort
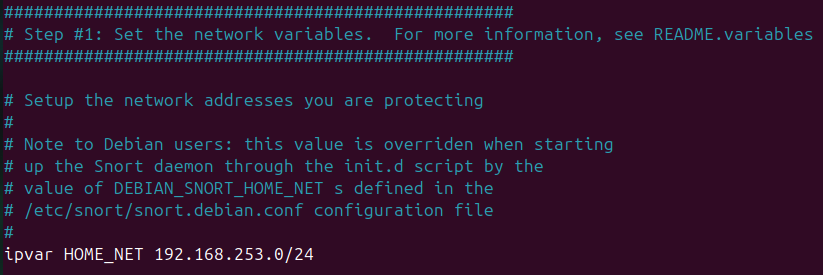
Once installed, Snort will ask you to configure the network settings, including the network interface to monitor and the IP range of your network. This can also be changed from within the configuration file located at /etc/snort/snort.conf.
If you want to use Snort to drop malicious traffic, you will need a second network interface to act as the blocking interface. Snort requires two network interfaces to effectively drop packets, enabling it to monitor live traffic on one interface while using the other to block malicious packets. This setup allows Snort to function as an inline intrusion prevention system (IPS), actively controlling network flow by dropping harmful traffic without disrupting legitimate communication. This second interface is only necessary on the Ubuntu VM.
Main Lab
We will make our custom rules in the local.rules file located at /etc/snort/rules. This file is where you can add your custom rules to detect specific network traffic patterns. It is not recommended to modify the default rules files, as they may be overwritten during updates. You can also make your own rule files, just be sure to include the path to it in the snort.conf file.
We will create rules to detect various types of network activity, such as pings, port scans, and web traffic. After creating the rules, we will test them against live network traffic generated by other VMs in our lab environment.
Detecting Pings
The first rule we will create is to detect ICMP echo requests (pings) sent to our Metasploitable machine. This rule will generate an alert whenever an ICMP packet is detected. The rule structure is as follows:
1
2
alert icmp any any -> METASPLOITABLE_IP any (msg:"ICMP Echo Request Detected"; itype:8; sid:100001;)
# checking for pings
Add this rule to the local.rules file and save it. The msg field specifies the message to display in the alert, and the sid field assigns a unique ID to the rule. The itype:8 field specifies the ICMP type for echo requests.
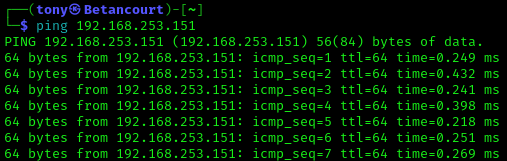
We can now test this rule by sending a ping from our Kali Linux machine to the Metasploitable machine. Open a terminal on the Kali machine and run the following command:
1
ping METASPLOITABLE_IP
Now, on Ubuntu, run the following command to start Snort in Sniffer Mode:
1
sudo snort -c /etc/snort/snort.conf -i INTERFACE -A console
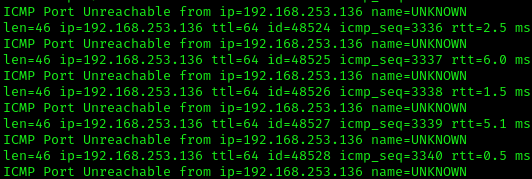
Adding the -A console flag will display alerts on the console in real time. Replace INTERFACE with the network interface you want to monitor. You should see alerts indicating that ICMP echo requests were detected.

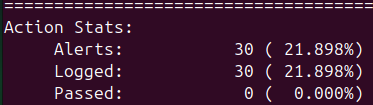
After ending the Snort process, you can view the alerts generated at the end of the output. This confirms that our rule is working correctly and detecting ICMP echo requests.

If you want to block the ICMP echo requests, you can modify the rule to include the drop action instead of alert. This will cause Snort to drop the packets matching the rule, effectively blocking the pings. Below is the rule with the drop action:
1
2
drop icmp any any -> METASPLOITABLE_IP any (msg:"ICMP Packet Dropped!"; itype:8; sid:100002;)
# blocking pings
Be sure to change the sid field to a unique value. After updating the rule, restart Snort and test the ping again. You should see that the ping is dropped.
You will need to use the -Q and --daq afpacket flags to drop packets. This will require the second network interface to be set up correctly. We will also make use of the -A full flag to log the dropped packets and provide deeper insight into the traffic. One of the log files we will examine will be located at /var/log/snort/alert, but you can add -l . to the command to log the files in the current directory.
1
sudo snort -Q --daq afpacket -c /etc/snort/snort.conf -i ens33:ens37 -A full -l .
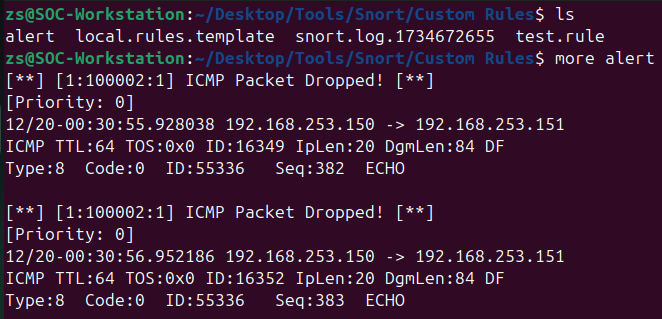
As you can see, the ping is now being dropped by Snort, and the alert is generated in the log file. This demonstrates how Snort can be used to actively block malicious traffic based on custom rules.
Detecting Ping Floods
For a more practical example, let’s create a rule to detect ping floods. This rule will trigger an alert when multiple ICMP echo requests are sent to the Metasploitable machine within a short period. The rule structure is as follows:
1
2
alert icmp any any -> METASPLOITABLE_IP any (msg: "Ping flood detected!"; itype:8; detection_filter:track by_src, count 20, seconds 5; sid:000004)
# detecting ping floods
We again indicate the ICMP type for echo requests with itype:8. The detection_filter option specifies that the rule should trigger an alert when 20 ICMP packets are sent from the same source IP address to the Metasploitable machine within 5 seconds. This rule will help detect ping floods, a common type of Denial of Service (DoS) attack. To test this rule, you can use a tool like hping3 to send a large number of pings to the Metasploitable machine:
1
hping3 -1 --fast METASPLOITABLE_IP
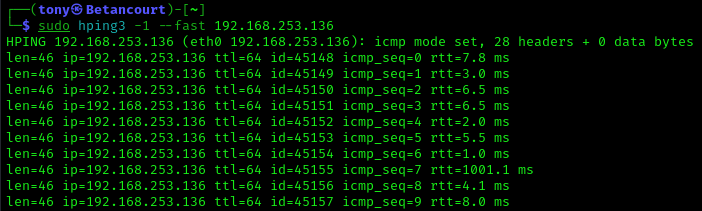
Running Snort in sniffer mode with the updated rule should generate alerts when the ping flood is detected. You can adjust the count and seconds values in the rule to fine-tune the detection criteria based on your environment and requirements.

Now let’s try to block this malicious traffic. Update the rule to include the drop action:
1
2
drop icmp any any -> METASPLOITABLE_IP any (msg: "Ping flood stopped!"; itype:8; detection_filter:track by_src, count 20, seconds 5; sid:000005; rev:1;)
# blocking ping floods
Be sure to run Snort in inline mode with the appropriate flags to drop packets. Test the ping flood again, and you should see that the packets are dropped by Snort.
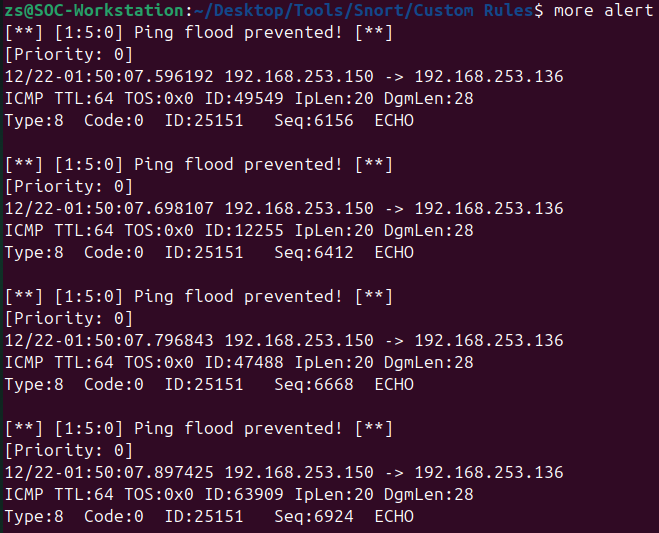
Back on the Kali machine, you will see that the ping flood is no longer successful, demonstrating how Snort can actively prevent DoS attacks by blocking malicious traffic based on custom rules.
HTTP Traffic Detection
Next, let’s create a rule to detect HTTP traffic to the Metasploitable machine. Metasploitable runs various vulnerable web services, making it an ideal target for detecting web traffic.
The rule we will make will simply detect connections to port 80, where the web server is running. The rule structure is as follows:
1
2
alert tcp any any -> METASPLOITABLE_IP 80 (msg: "HTTP Traffic Detected on Metaploitable SRV"; sid: 400001; rev:1;)
# detecting HTTP traffic
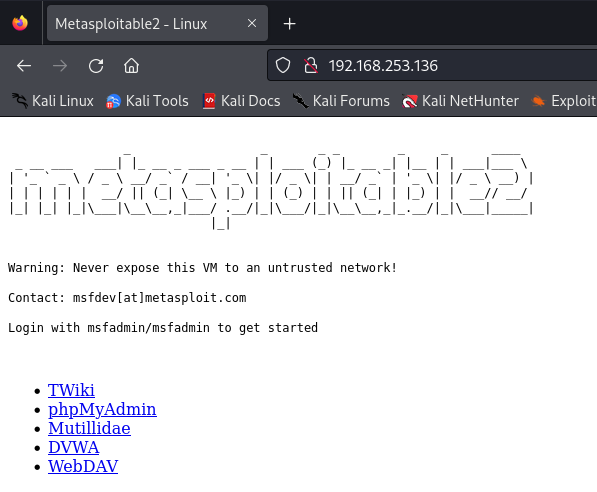
Running Snort in sniffer mode with this rule will generate alerts whenever an HTTP connection is made to the Metasploitable machine. You can test this rule by accessing the Metasploitable web server from your Kali machine using a web browser:
After accessing the web server, you should see alerts in the Snort output indicating that HTTP traffic was detected:

If we want to block HTTP traffic, we can modify the rule to include the drop action:
1
2
drop tcp any any -> METASPLOITABLE_IP 80 (msg: "Blocked HTTP traffic to Metasploitable"; sid:400002; rev:1;)
# blocking HTTP traffic
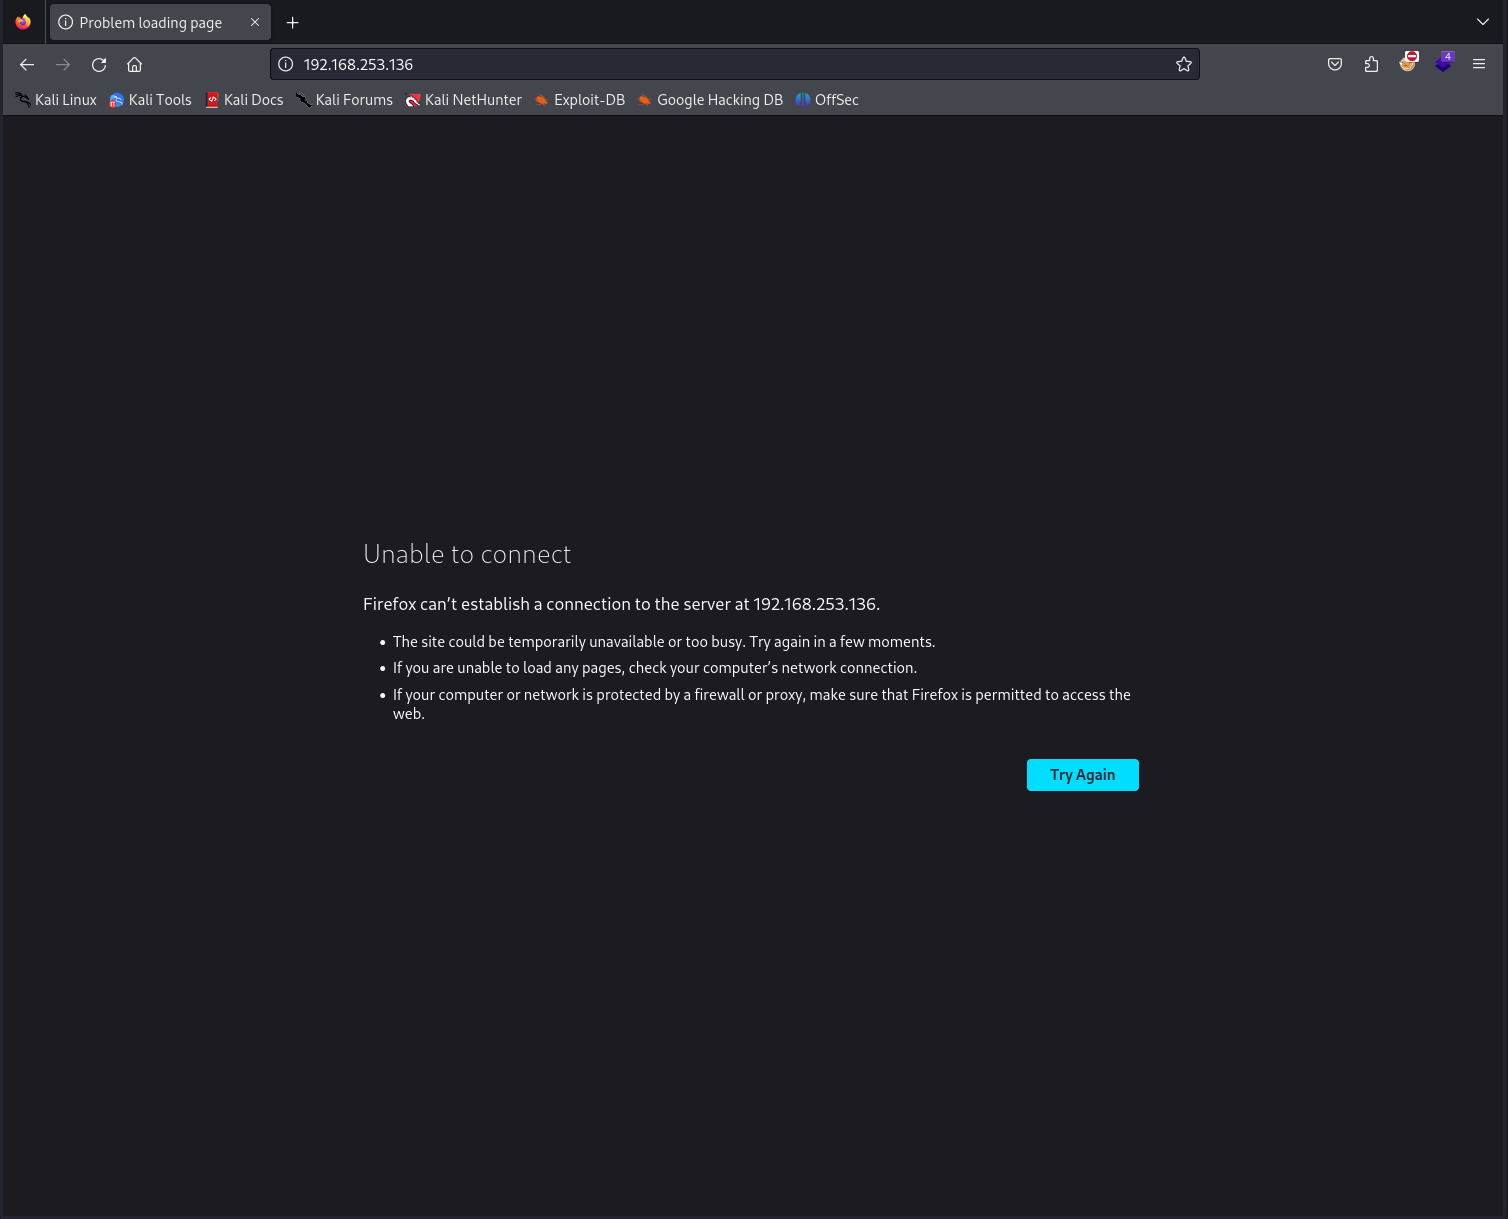
After updating the rule, restart Snort in inline mode with the appropriate flags to drop packets. Test the HTTP connection again, and you should see that the connection is blocked by Snort.

In a real environment, you would want to create more sophisticated rules to detect specific types of web traffic, such as SQL injection attempts, cross-site scripting (XSS) attacks, or file inclusion vulnerabilities. It is not recommended to block all HTTP traffic, as this could disrupt legitimate web services.
Files over HTTP
More interestingly, we can create rules that will detect files over HTTP. There are many file types to detect, but I’ll focus on a few common ones to demonstrate Snort’s effectiveness.
The rule structures are as follows:
1
2
3
4
5
6
7
8
9
10
11
12
13
14
15
16
17
18
19
20
21
22
23
24
25
26
27
28
29
30
31
# Image Files
alert tcp any any <> any 80 (msg:"PNG image file detected over HTTP"; content:"GET"; http_method; content:"png"; http_uri; sid:4000006; rev:1;)
alert tcp any any <> any 80 (msg:"JPEG image file detected over HTTP"; content:"GET"; http_method; content:"jpeg"; http_uri; sid:4000007; rev:1;)
alert tcp any any <> any 80 (msg:"GIF image file detected over HTTP"; content:"GET"; http_method; content:"gif"; http_uri; sid:4000008; rev:1;)

# Document Files
alert tcp any any <> any 80 (msg:"PDF document detected over HTTP"; content:"GET"; http_method; content:"pdf"; http_uri; sid:4000009; rev:1;)
alert tcp any any <> any 80 (msg:"Text file detected over HTTP"; content:"GET"; http_method; content:"txt"; http_uri; sid:4000010; rev:1;)

# Audio Files
alert tcp any any <> any 80 (msg:"MP3 audio file detected over HTTP"; content:"GET"; http_method; content:"mp3"; http_uri; sid:4000013; rev:1;)

# Video Files
alert tcp any any <> any 80 (msg:"MP4 video file detected over HTTP"; content:"GET"; http_method; content:"mp4"; http_uri; sid:4000015; rev:1;)

# Compressed Files
alert tcp any any <> any 80 (msg:"ZIP file detected over HTTP"; content:"GET"; http_method; content:"zip"; http_uri; sid:4000018; rev:1;)
alert tcp any any <> any 80 (msg:"RAR file detected over HTTP"; content:"GET"; http_method; content:"rar"; http_uri; sid:4000019; rev:1;)

# Script Files
alert tcp any any <> any 80 (msg:"JavaScript file detected over HTTP"; content:"GET"; http_method; content:"js"; http_uri; sid:4000020; rev:1;)
alert tcp any any <> any 80 (msg:"PHP script detected over HTTP"; content:"GET"; http_method; content:"php"; http_uri; sid:4000021; rev:1;)
alert tcp any any <> any 80 (msg:"Python script detected over HTTP"; content:"GET"; http_method; content:"py"; http_uri; sid:4000039; rev:1;)

# Web Files
alert tcp any any <> any 80 (msg:"HTML file detected over HTTP"; content:"GET"; http_method; content:"html"; http_uri; sid:4000026; rev:1;)

# Executable Files
alert tcp any any <> any 80 (msg:"EXE file detected over HTTP"; content:"GET"; http_method; content:"exe"; http_uri; sid:4000030; rev:1;)
alert tcp any any <> any 80 (msg:"DLL file detected over HTTP"; content:"GET"; http_method; content:"dll"; http_uri; sid:4000031; rev:1;)
alert tcp any any <> any 80 (msg:"BAT file detected over HTTP"; content:"GET"; http_method; content:"bat"; http_uri; sid:4000032; rev:1;)
For this section of the lab, I used an HTTP server to host a bunch of smaple files that were used to test the rules.
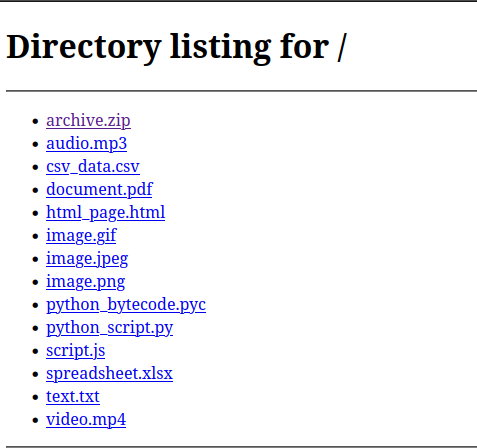
Before downloading several files, I again ran Snort to detect the files being downloaded. We can view the traffic captured in Wireshark to get a better understanding of what is happening before moving on to the alerts generated by Snort.

And the alerts:

The rules are working as expected, and Snort is detecting the files being downloaded over HTTP! Wireshark shows the traffic from the various file types being downloaded, and Snort generates alerts for each file type detected.
Conclusion
This completes the objective of this lab, but there are many more rules that can be created to detect various types of network activity. I can’t cover them all in this post, but in the next part of the lab I will show more advanced rules and techniques for using Snort to enhance network security such as port scanning and specific attacks. Be sure to check back for the next part of this lab!